OVERVIEW SUMMARY: EPSON EASYMP VULNERABILITIES
As part of a targeted, customized security assessment, the Rhino Security Labs team was tasked with identifying anything which would interfere with a major technology conference. In addition to other areas, this led us to research the security of Epson projectors, and specifically EasyMP – a proprietary screen share and projector management protocol. This tool allows users to remotely control common projector functions over wifi, including changing configurations and streaming a user’s screen.
In the course of this projector security research, two zeroday vulnerabilities were identified in EasyMP, both of which allowing administrative access of the Epson projector (including a remote streaming of the attacker’s screen over wifi).
The first of these vulnerabilities (CVE-2017-12861) is a simple brute force vulnerability of the 4-digit PIN used to authenticate users to EasyMP. With no lockout or throttling functionality, an attacker can bruteforce the entire keyspace (10,000 combinations) in less than 30 seconds.
The second — and more serious — vulnerability was discovered in the process of confirming the brute force bug across multiple Epson devices – a hardcoded, backdoor PIN which was universal across all projectors supporting the EasyMP management application (CVE-2017-12860). This removes the need for an attacker to use the aforementioned bruteforce, as this can be used to immediately take control of any supported projector on the local network.
Both of these vulnerabilities were responsibly disclosed to the vendor – who did not reply. After several attempts to get these resolved without a response, we’ve decided to move forward with full disclosure. Details of the disclosure timeline are available at the end of this article.
BACKGROUND: INTRO TO EPSON EASYMP
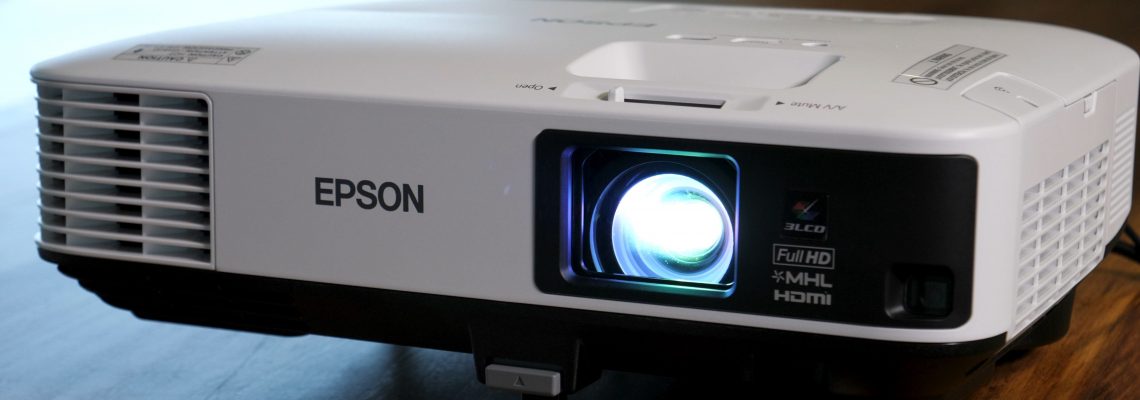
Many of the newer Epson projectors — including the Epson PowerLite Pro — support a device management and screen sharing application known as EasyMP. This tool allows users to control critical functions and display their screen on the network-enabled projector without the need for additional cabling.
The EasyMP protocol is proprietary, but aspects of the screen sharing side appear to be related to VNC based on string references in the code. When the projector is in EasyMP mode, it waits for an EasyMP connection and, upon successful authentication, displays the user’s screen on the projector.
To use EasyMP mode, the user first needs to download the EasyMP software from Epson. The user then needs two pieces of information to connect to the proprietary protocol: The projectors IP address, and a 4 digit PIN (or ‘keyword’) — displayed through the projector itself which changes every 5 minutes.

The projector displays this on the screen when it is in EasyMP mode and is waiting for a connection.
CVE-2017-12861: EASYMP BRUTEFORCE VULNERABILITY
The logic of the EasyMP pin is to allow only those who can see the screen to connect to the projector, assuming only legitimate users will be able to see the screen (which may or may not be true, depending on the environment).
Even so, this would theoretically prevent someone from remotely connecting and taking over the visual feed.
So far we have identified and reported two vulnerabilities in this system.
The first issue is that there’s no lockout or throttling after multiple failed password attempts. The backdoor password was discovered through the creation of a custom bruteforcer for the protocol, and even after 10,000 failed attempts (0000-9999) in under 30 seconds minutes, the projector still accepted a new connection attempt. With such a small key space (10k permutations), this provides a significant risk.
More serious, however, is what was identified after testing the brute force script — a hardcoded password backdoor hardcoded into all EasyMP-supported Epson projectors. In addition to the displayed authentication keyword on the screen, 2270 will always authenticate.
EXPLOITATION USAGE
Exploiting an Epson EasyMP projector with the backdoor keyword is fairly straightforward. Click on the target projector and click connect. A dialog will pop up asking for a Keyword. Instead of entering the displayed PIN, enter 2270 and click ok.
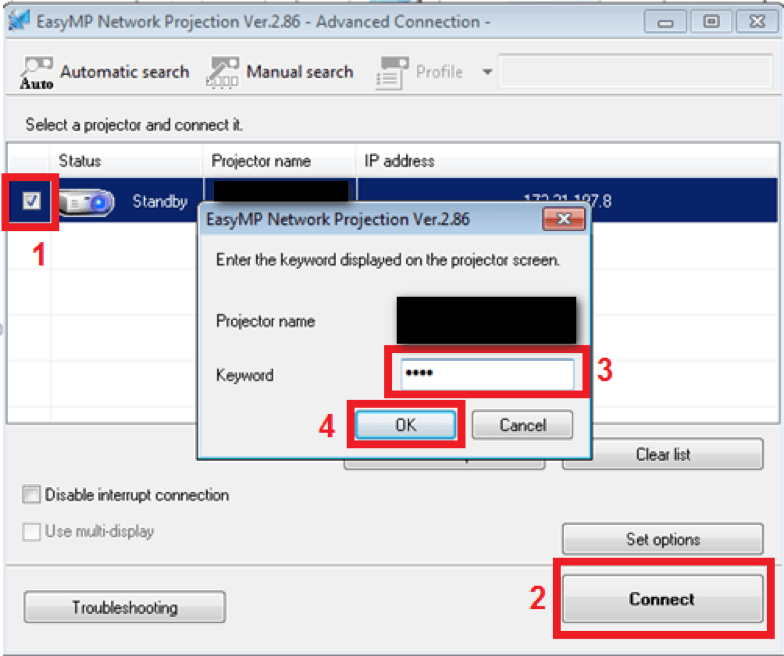
EasyMP main window with connection dialog open. Check the checkmark (1), click connect (2), enter 2270 as the keyword (3), and click ok (4).
After clicking connect, the program will connect to the projector and the following dialog will pop up.

EasyMP Control panel dialog. Allows user to control projector input and display their screen.
Once you’ve connected and selected the EasyMP input, you should see your screen being projected. When you’re done, just click disconnect on the control panel dialog box, and the projector will go back to what was previously displayed.
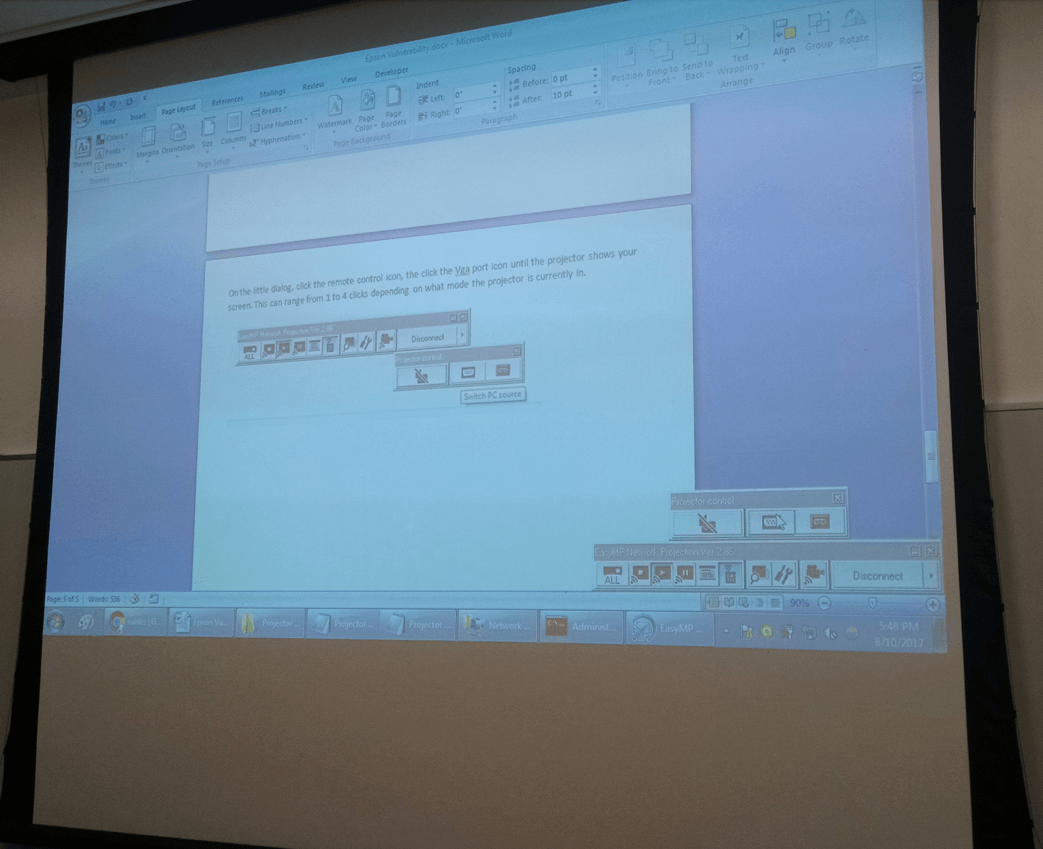
The user’s screen being displayed by the projector using the EasyMP utility.
VULNERABILITY DISCOVERY PROCESS
This vulnerability was discovered using a bruteforcer coded in Python. The bruteforcer works by replaying an authentication request packet and changing the pin each time. It then checks a flag in the response packet to determine if the authentication was successful or not. The EasyMPutility has a timeout coded into it on failed password attempts, so it was not practical to write a macro to attack that application. The actual authentication protocol has no timeout or lockouts after failed attempts, so it was a prime target.
EASYMP TRAFFIC ANALYSIS
The first step to writing the bruteforcer was analyzing the traffic between the EasyMP program and the projector. Wireshark, a packet capturing application, was used to capture the authentication packets. Authentication works by sending a packet with the pin to port 3620 on the projector. If the password is correct, a particular packet is returned, and if the password is wrong, a different packet is returned. The bruteforcer looks at the 51st byte of the returned packet and compares it to zero to determine whether authentication is successful or not.
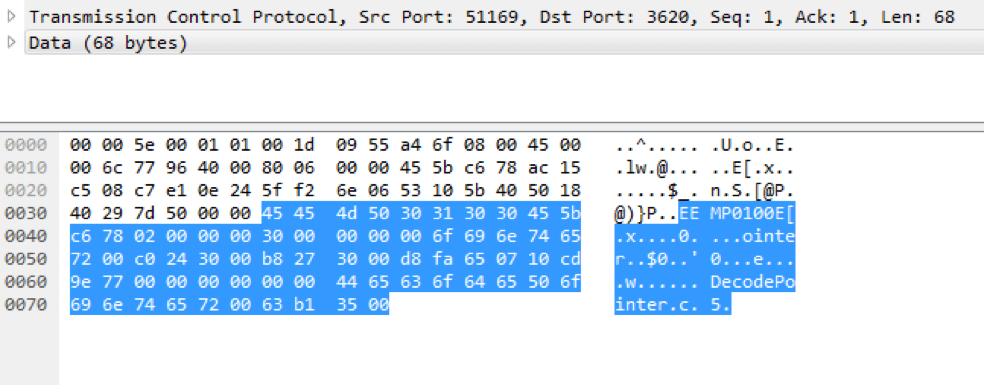
Screenshot of Wireshark showing the packet returned by the projector after an authentication request. The 51st byte in this packet tells whether the authentication was successful or not.
BRUTEFORCING A PROPRIETARY PROTOCOL
To allow the bruteforcer to simulate the EasyMP program, the raw authentication request packet was copied in hex format and into the python script, using the password as an iterative variable. The script then uses sockets to send the data to the target projector and to receive a response to analyze.
After finishing the bruteforcer, it was run against several projectors in EasyMP mode. While running it, we noticed the pin 2270 kept coming up as successful regardless of what was displayed on the screen. Upon further testing, it appeared to be a backdoor keyword which worked on all EasyMP-supported projectors.
Our Python script for the bruteforcer is included in the Rhino Security Labs Github.
CVE-2017-12860: EASYMP BACKDOOR PIN
BINARY CONFIRMATION: REVERSE ENGINEERING EASYMP
The backdoor password was originally discovered using a blackbox approach on the device, bruteforcing possible combinations and confirming that 2270 would always authenticate.
However given similar malicious attacks which resulted in similar backdoors — such as the ones identified in Juniper devices — we decided to confirm the location/context of the issue, providing the details to the vendor for confirmation and patching of the issue. To identify this we reverse engineered the Epson firmware.
GETTING THE (ENCRYPTED) FIRMWARE IMAGE
The first step was getting a hold of the firmware. While the projector model tested — PowerLite Pro G5650W — did not have any firmware available, a review of the Epson website provided firmware updates for other models. The closest model on the site was the PowerLite Pro G6050W, which was used for testing here.
The first thing we did was open the 54Mb firmware image in a hex editor.
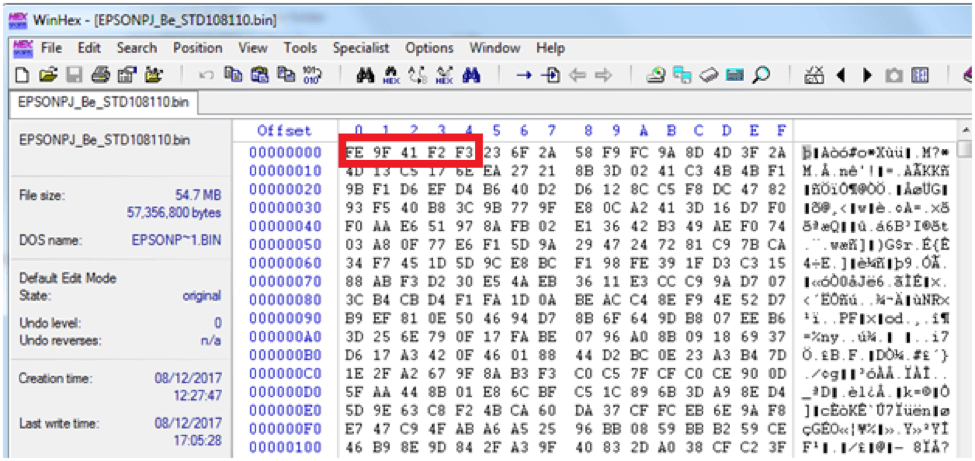
Firmware image open in Winhex, a hex editor. Note the first 5 bytes in the red box as we use them later.
Right away we identified the file as encrypted or otherwise obfuscated. Usually, firmware images will have some human-readable strings, but there was not a single string in the entire image. To figure out what was going on, we downloaded the firmware update tool from Epson and opened up the firmware with it.
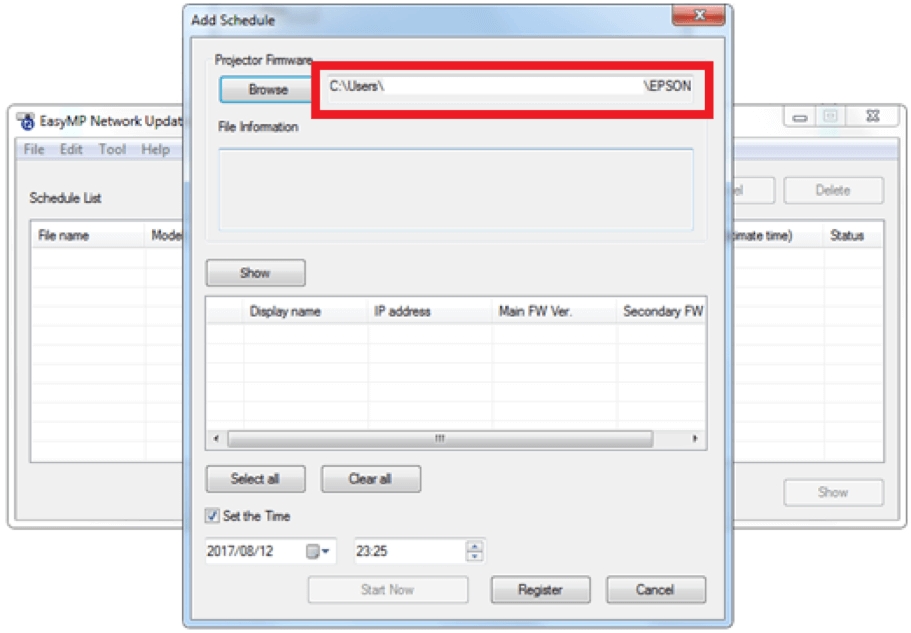
Firmware update utility window. Firmware has finished processing the path is now displayed in the textbox.
After clicking browse and selecting the file, there was a suspiciously long delay before the path would show up. We suspected this was when the decryption/decompression was happening.
Testing for exactly this, we tried changing a byte in the firmware image and loading it into the program – which promptly crashed it. A small success in itself, this means the firmware update utility is doing some kind of processing on the file — most likely file decryption — and we need to extract the image in memory just after that point.
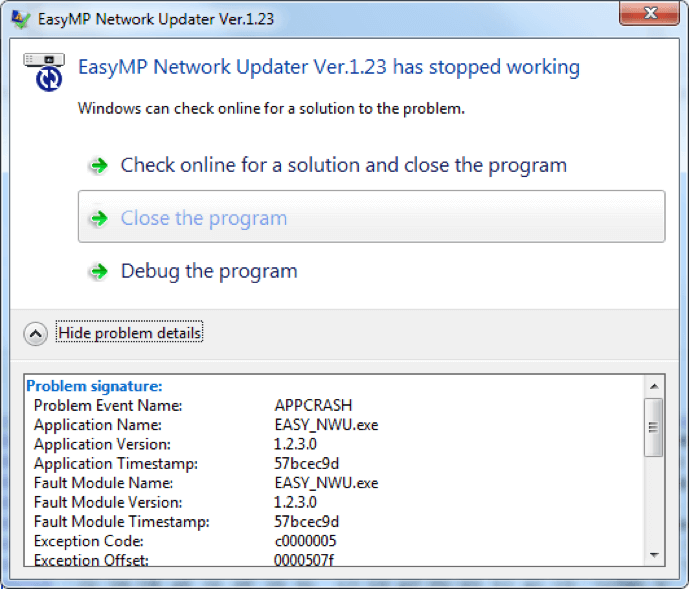
Windows dialog telling us that the firmware update utility has crashed (after a single byte change).
Now that we know the firmware update utility is decrypting the file, we need to figure out where and how. To do this, we loaded the software into Windbg, a Windows debugger. We then made the program crash and were able to locate in the program where the crash was occurring. The crash happened at location 0x507F as seen after “Exception Offset” in the screenshot above.
Next we opened the program up in IDA Pro disassembler. The disassembler breaks the program down into assembly language so we can see what it was doing behind the scenes. We navigated to offset 0x507F and then poked around in the code leading up to the crash point. Eventually, we were able to locate the decryption routine.

Screenshot of the disassembly in IDA. The call to the decryption routine can be seen in red box 1.
Now that we knew where the decryption routine was, we are able to use it to decrypt the firmware. We opened up the firmware update utility in Windbg and set a breakpoint right before the decryption routine. A breakpoint causes the debugger to pause execution. While it’s paused we can explore memory and register values and examine the assembly.
We ran the program until it hit the breakpoint just before the decryption routine (DecryptFirmware in the screenshot above). Examining the assembly and registers, we confirmed where the firmware image was located in the update utility memory.
Red box 2 (below) shows the call to the decryption function. Right before the call, we see register ESI being moved into register EDI (red box 1). EDI is one of the parameters passed into the decryption function.

Disassembly of the routine containing the call to the decryption function. The location of the firmware is passed into EDI (1) before the decryption routine is called (2).
We suspected EDI may contain the address of the firmware image in memory, so we checked what was in EDI.
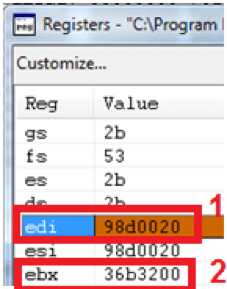
Registers window showing the values of all the registers. EDI (1) contains the address of the firmware in memory. EBX (2) contains the length of the firmware data.
EDI contained the address 98d0020 as seen in red 1 above. We navigated to 98d0020 in the memory window to see what was there. Red box 1 below shows us navigated to the address 98d0020. Red box 2 below shows us the first 5 bytes of the memory at this location. If you look back to the beginning of this article at the Winhex screenshot, you’ll see they are identical to the bytes in the firmware image.
This confirms that EDI contains the address of the firmware. The other important thing to know is the length of the data. This was stored in EBX and is 36b3200. This is seen above in red box 2.

Memory window showing the encrypted firmware image in memory. The address can be seen in red box 1. The first 5 bytes (red box 2) are identical to those of the firmware image shown in the first picture of the article confirming we found the image.
Now we have confirmed the location of the image in memory, we can run the decryption routine and see what happens.
The routine took about 15 seconds to run, but after it was done, the firmware image located at EDI was now decrypted. You can see how the address is the same (red box), but all the data has changed because it has been decrypted.

Memory window displaying the now decrypted firmware image.
Now we have the decrypted image in memory, but how do we get it out? As we recall, EBX contains the length of the image which is 0x36b3600. So from EDI to EDI+0x36b3600is our decrypted firmware image. To get it out of memory, we used Winhex to take a memory snapshot of the process.
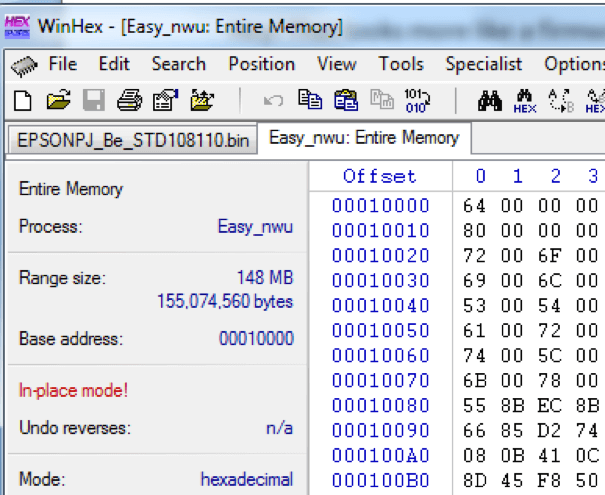
Winhex taking a snapshot of the firmware update utility’s memory.
We saved the snapshot as a file, then opened it back up in Winhex. Saving it as a file remapped the memory addresses, so we no longer knew the image location. To find it again, we did a search of the first string that appears in the image. The result is highlighted in yellow. Then we marked the beginning of the image as the beginning of the block. We navigated to the current position +0x36b3600 and marked that as the end of the block.

Winhex window displaying the search results (highlighted in yellow). We marked the beginning of a selected block at the beginning of the decrypted firmware image.
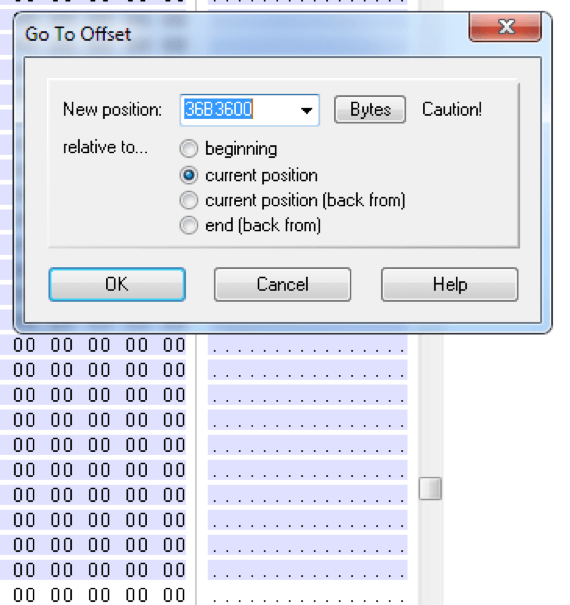
Winhex navigation window. Navigating to the end of the decrypted firmware image and selecting all the bytes.

Winhex edit menu. This was used to export the selected firmware image bytes into their own file.
Now we copied the block into a new file and had a complete decrypted firmware image. With a cleartext version of the firmware, the hard part is over.
ANALYZING THE (DECRYPTED) FIRMWARE IMAGE
Firmware images can be tricky because they’re binary blobs that often contain a variety of information. This can include executables, compressed file systems, data files, and many other formats. Luckily a tool called Binwalk exists to help us see what makes up these blobs. Binwalk looks for signatures that indicate the beginning of certain types of files. After running Binwalk, we found a CramFS filesystem inside the image.

CramFS filesystem signature in the Vinwalk results.
After a number of red herrings and false starts, we found the signature for CramFS. CramFS is a very popular filesystem for embedded systems, and a good chance it contains the operating system for the projector.
We extracted this section of the image and isolated it into a new file. We then used a tool called Cramfsck to decompress the filesystem. After decompressing it, we discovered it was an embedded Linux system.

Directory structure of the embedded operating system clearly shows its linux.
Now that we had what we the operating system, how are we going to find the executable and routine that manages keyword authentication? We could look through all the executables one by one, but that would take forever. I recalled when we were doing the packet sniffing, the projector would return the string “EEMP” followed by some numbers.

Searching for EEMP within the results of strings. EEMP was present in an executable called vortexd, which manages the EasyMP authentication.
ANALYZING THE EXECUTABLE
After all this, we finally had the authentication binary responsible for authenticating EasyMP sessions to the projector. We loaded it into IDA and did a text search for the backdoor keyword identified (2270) – one result popped up.

Hex dump in IDA showing the hardcoded backdoor password.

Disassembly view in IDA showing a reference to the backdoor keyword.
There was a code reference to data 8 bytes before it, so we checked out where that reference was coming from. The reference was in a function named AnalyzeRequestConnect. Looking at the routine the reference was made from, it actually adds 8 to the address before storing it on the stack, so this was a direct reference to the backdoor keyword.

The address 8 bytes before the backdoor keyword is loaded into R3 (1). 8 is then added to that address to give the address of the backdoor keyword (2), and then the backdoor keyword is pushed onto the stack at 1B (3).
The routine takes 2270 and stores it on the stack at 0x1B. Further down the code, we find another reference to 0x1B.
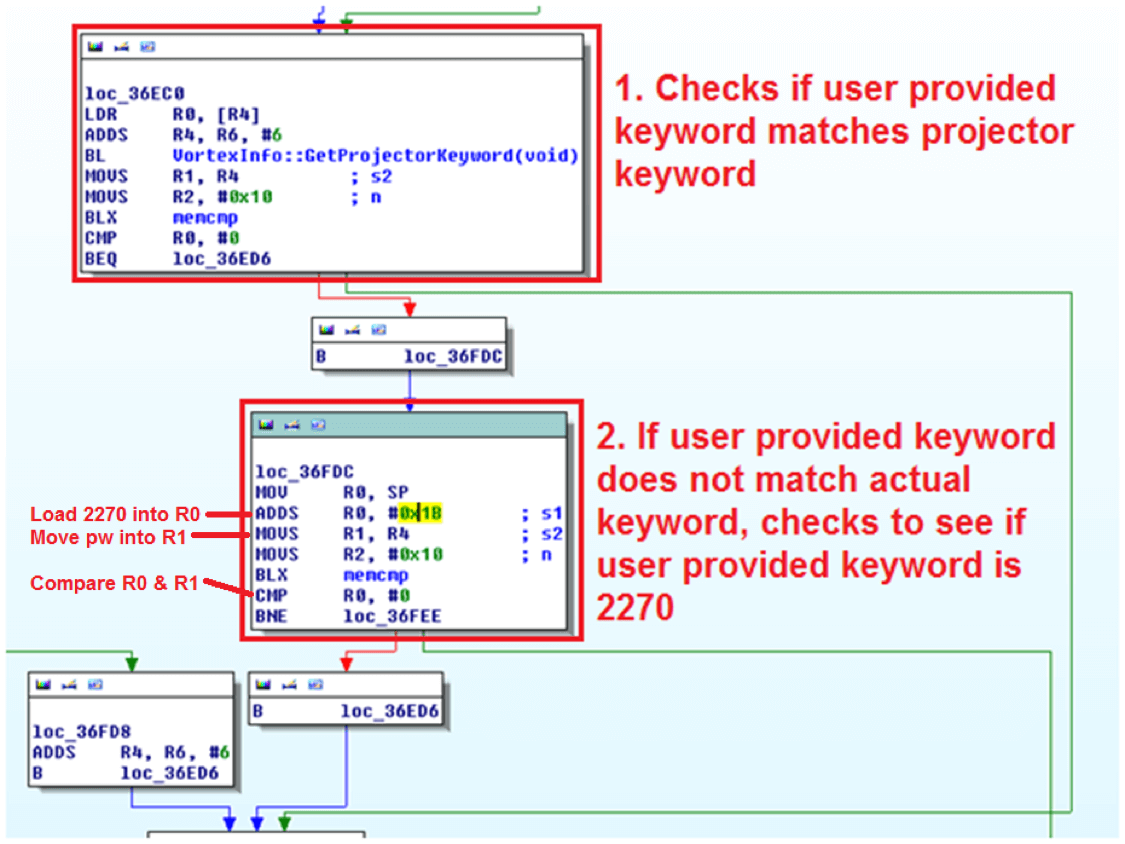
Disassembly of the authentication routines in IDA.
The first routine in the screenshot (1) is the where the actual keyword checking occurs. If the keyword is invalid, it then jumps down to the 3rd routine (2) where it compares the keyword against stack offset 0x1B (‘2270’).
If the user provided keyword matches either the actual, randomly generated keyword or the hardcoded backdoor keyword, the connection is allowed to proceed.
CONCLUSION
During a routine security assessment, we were tasked with identifying potential security risks with Epson projectors. A blackbox research of the 4-character password authenticating to management application EasyPM confirmed a lack of authentication timeout or lockout, making is susceptible to brute force attacks.
In the course of the same research, identified the same application as having a hardcoded backdoor PIN 2270 which would authenticate against all supported projectors. Responsible disclosure to Epson was attempted multiple times (including through MITRE), without success.
DISCLOSURE DETAILS AND TIMELINE
8/02/17 – Initial outreach to vendor (multiple channels, as there’s no security contact page)
8/13/17 – Contact through generic Epson support email
8/14/17 – Response from Epson support – “Please provide more details of the security vulnerability…”
8/14/17 – Details provided on the vulnerability; provided contact information for additional follow-up
8/15/17 – Response from Epson support – “I have referred this issue to Management. You will be contacted…”.
No further reply
8/15/17 – MITRE contacted; CVE’s issued.
8/25/17 – Followup contact to Vendor. No reply.
9/14/17 – Final contact attempt with the vendor. No reply.
9/19/17 – Full Disclosure of vulnerabilities

